Showing posts with label vintage. Show all posts

Thursday, April 14, 2011

Tutorial: Make vintage-inspired earrings

Yes, you may be thinking wait—she's leaving for Viva Las Vegas in the week. What the heck is she doing writing up a crafty tutorial?! Well the fact of the matter is that I actually made these earrings for my trip, so I took some photos along the way to share.

I love vintage earrings as much as the next gal, but as we all know, most earlier earrings are screw back or clip on styles. Not really that comfortable if you ask me, and sometimes the back isn't in very good condition, either. So I thought it would be fun to whip up my own vintage-inspired earrings with more comfortable supplies. These are a great alternative when you're worried you'll lose one of your most precious vintage earrings or your ears just need a break.

I am almost embarrassed to present this as a tutorial since it's so easy: get the supplies, glue them together, let them set up. I'm hardly reinventing the wheel here. But humor me, and I'll give you a bit more details so you can try it yourselves!


How to make your own vintage-inspired earrings

Supplies you'll need
  • 2 matching items for the front of your earrings. I used resin cabochons, which are easily found on Etsy or eBay for pretty cheap. Take a look at a search for them. (Tip: if you're looking on Etsy, make sure to select "Supplies" from the search menu.) You could use large buttons, large beads, a pair of broken vintage earrings or parts from a vintage thermoset necklace or bracelet, miniature fruit meant for dollhouses (seriously, I'm totally smitten with this idea after seeing so many pair of vintage fruit basket earrings)... really the sky is the limit here. The main thing is that the back of the item needs to be flat so you can attach your earring post. I do have a fondness for flower cabochons, however, since I think they have a very vintage feel to them. I picked two coral-colored rose cabochons. Aren't they pretty?

  • 2 earring posts. Again, these are very easy to find on eBay or Etsy (Etsy example here). You can buy a bag large enough to make a dozen or more pair for just a few bucks. I went with stainless steel and a wider 10mm base for maximum surface area.

  • 2 comfort earring clutches. When you order earring posts they will likely come with standard butterfly clutches. However, I highly recommend ordering separate clutches, which are sometimes called "comfort clutches" and are much wider at the base (Etsy example here). Now this is a matter of personal preference and size of what will be on the front of your earring. My rose cabochons were almost 1" across, so I needed to distribute the weight on more surface area of my earlobe. There's no way I could have used a standard butterfly clutch. Check out the difference in size and you'll understand why. The one on the right will give you a more comfortable, sturdier base and prevent larger earrings from pulling away from your earlobe. (Hint to you gals with stretched ears: they also allow you to wear earrings on a day you don't feel like plugs, if your gauge is about 1/2" or less.)

  • 2 part epoxy. There are lots of brands out there. I'm no expert, but I used Epoxy 330 with good results. Just make sure to get the kind that comes in two tubes that you mix together. I went with one that dried clear.

  • Acetone and a cotton swab. You can use acetone and a cotton swab to clean both sides of your working materials prior to bonding them together. I used my nail polish remover—but don't do that if you use the non-acetone variety. ;)


Instructions

Gathering the supplies is probably the hardest and most time-consuming part. But once you have all of those items on hand, you'll be set to make a ton of cute earrings that look vintage!

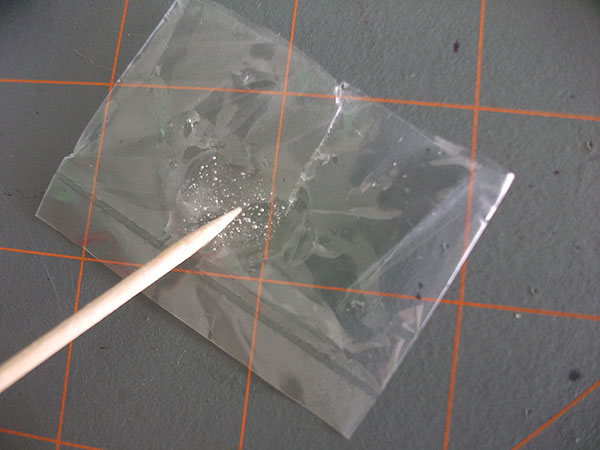
Step 1.  Squeeze out equal amounts of each of your tubes of epoxy on a disposable surface.  Make sure your working surface is suitably covered in case your glue travels around as you work. You wouldn't think it was easy to get glue on other surfaces when you're mixing an itty bitty amount, but you'd be wrong. Trust me. I mixed my epoxy on a piece of a plastic bag placed on one of my cutting mats.

Step 2.  Mix the epoxy for a good few minutes.  This is boring and seems unnecessary, but trust me, it goes a long way in making a strong bond. Put a good tune on and stir, stir, stir with a toothpick or something else small and disposable. You'll see bubbles start to form in your epoxy mixture.


Step 3.  Let the epoxy sit for several minutes to thicken.  Don't be tempted to rush this process. Epoxy takes a long time to harden, so you're really not in any danger of your mixture setting up before you get a chance to actually use it. If you're worried, periodically go over to it and give it a stir. You'll notice it getting thicker but not hard. That's exactly what you want. If you use it too soon the mixture will be too watery and your earring post may slide around while it's hardening (I'll show you of a photo of that in a couple of steps). Read your particular epoxy's instructions. Mine thickens in 15 minutes and doesn't harden for 2 hours.

Step 4.  Clean off the surfaces you'll bond together.  This means the flat part of your earring post and the back of whatever you're using for your earrings (in my case the rose cabochons). Take a cotton swap and just wipe a little acetone over both. I do this step now because it gives me something to do while I'm waiting on the epoxy to thicken. (Smart planning, huh?)


Step 5.  Once your epoxy has thickened, apply the mixture to your earring posts.  I use just enough to cover most of the back of the earring post, which should be enough to have just a bit squeeze out of the sides when they're attached. Before you place the post on, eyeball where you'd like it to go (and make sure both of your items are facing the same direction!). If you're using something large or heavy I would recommend placing the post a bit higher than center so that it's not top-heavy, preventing the tendency for the earring to fall forward from your earlobe. See how I did that with my roses?


Step 6.  Wait and then fiddle around if necessary.  That sounds like a silly step, doesn't it? Really what I mean is give your earrings some time to set, but check on them periodically. If the front of your earrings are not perfectly flat you may find the post slid around a bit if you didn't let your epoxy thicken long enough. Before you hit the stage where the epoxy is really and truly hard, you still have some wiggle room, literally and figuratively. Take a look at my example below. (Yes I did throw another set of earrings in there, little navy blue mums!)


Step 7.  Wait 24 hours.  Really, you don't have to wait quite that long, but I prefer to make sure my epoxy is 100% set before I test drive my new earrings.

That's all there is to it! Once your epoxy has set, you have fabulous new vintage-inspired earrings!


Aren't they sweet little things?


Don't they look like something these lovely ladies from the 1943 Sears Catalog would wear?


Go on, give your new earrings a test drive!


Hope you enjoyed this little tutorial!

Tuesday, January 18, 2011

Finished project: Blenders blouse

I finally got photos of my first sewing project of 2011. It was a project I started last year. In fact, it was the last sewing project I touched last year. I am now not 100% sure why I tossed it to the side, but I know one reason was due to a beginner's error of not remembering that if you don't clip corners of an angle before trying to turn it, it's going to be lumpy and weird looking and you're going to think you did something wrong.

I hope I can gain confidence with every new project this year. This was a good start. The fact that I returned to it several months after shoving it in the closet was amazing in its own right. The fact that I then finished it—well, the world may have tilted on its axis just a wee bit.

It was an Advance pattern. I can't remember the number as I'm not home, but I just barely showed a picture of it in my post when I was explaining about pin basting the sleeves.


It's a button-down blouse with a one-piece collar. (And oh, how I loved working on that collar compared to my current project.) It's supposed to have a little self-fabric tie for a scarf around your neck, but really, I'm not in Girl Scouts. Not happening.

I'm pleased with the final result (though I was wrong when I said it buttons high enough to cover my tattoos at work, it really doesn't but a higher button next time would work). It fits a bit like a camp shirt since there weren't any darts or tucks on the body except bust darts, but it's the type of blouse I'd usually wear tucked in anyway.


You can't really tell from the photos, but the sleeve cuffs are turned back. That's about the only thing I'd change in the future. I like the turned back look but the amount of extra sleeve fabric the pattern called for was ridiculous. I'm not sure why I didn't chop off several inches, but I didn't, so the cuff is a little bit stiff from the extra fabric. Depending on how it washes, I may go back and re-do that part, but I'm leaving it for now.


And this is the perfect type of blouse for me. The type of thing I wear 90% of the time.


I've been thinking about the post and resulting comments on Susannah's Fashion on the Ration Part I post. In the new year, so many of us seem to be re-assessing our wardrobe. What do we actually like to wear? What do we like to knit or sew? What holes can we fill in, bought or made? I know I need to do more  self-reflecting in this department. Last year I spent most of my time knitting sweaters that I never, ever wear, with few exceptions. Styles that I was drawn to knit because they were fun, not because they would have any place in my wardrobe whatsoever. I will not be doing that this year. I'm trying to fill in gaps. I could use a few matched sets of mittens or gloves and hats. I could use a few more short-sleeved sweaters for Spring or Fall. I could use a few more basic handknit cardigans. Even if I knit less this year, I want each piece to have a proper place in my wardrobe.

Because I'm only just starting to sew for my wardrobe, I can't look at it the same way as I can my knitting. I'm not going to fill in gaps per se, but sew what I actually like to wear. I'm already pushing it by doing the Swing Dress Sew Along, but I do really want to tackle sewing dresses, even if I know I rarely wear them. Like Susannah, I want to focus on everyday appropriate sewing. Things I will reach for time and time again when I open the closet. I know in practice this will mean mostly blouses (until I feel confident enough to try pants, but I feel that's a long way off). So far in my experience, finding patterns for vintage blouses that don't look exactly the same can be a bit of a challenge, but it's a challenge I'll willingly accept.

I'm going to ruminate a little more about this topic. In the meantime, I know that I started off 2011 by finishing a 'wardrobe' blouse a week and a half ago.  I've worn it three times since then. I think I'd call that a success!

Sunday, January 16, 2011

One step closer

We got home this afternoon, having had a wonderful brief trip to Wisconsin with our friends. I'll be posting photos tomorrow because—yay!—I have the day off work.

In the meantime, I thought I'd post the fabrics I'm considering for my current blouse. After my epiphany earlier in the week, I didn't really get a chance to sit back down with my muslin until we got home today. I finished off the collar, set in one sleeve and moved all the darts for my short-waisted self. I'm really pleased with the fit, I think I've worked out the kinks and I'm ready to dive in. But but but... now I have to decide on the fabric!

The pattern is Simplicity 4256, view 3 at the bottom. I'll be doing it minus the pocket, and may replace the top button with a loop and button closure to the side, which some of my vintage shirts feature and I kind of like. (Plus it would mean one less buttonhole to fret about. I like that my machine can do 4 step buttonholes but I would be lying if I said I didn't grit my teeth in suspense during each and every one.)


I've decided to use some quilting cotton from my stash. I know it will work well for this particular pattern since the muslin has a structured shape that I'm really liking (though I think in the future I'd like to try a version in a nice drapey fabric, like in a small floral print). I have several ridiculously whimsical possibilities, but just can't decide.


So what do you think: lemons, technicolor bunnies, castles, or birds in birdcages?

They are each so silly and I love the idea that one will turn into a blouse that will rotate into my redefined work wardrobe. Some of my favorite vintage pieces feature equally bizarre and whimsical prints. Horse heads all over a dress, knights in shining armor or ducks on a blouse. So I love that I can channel a bit of that in my own sewing. I mean, how could you not smile if you looked down at your shirt, while sitting in your cubicle, and saw a fluffy butt on a green bunny?

Thursday, January 13, 2011

Stick-to-it-ness

Yesterday evening I sat down to actually begin work on the muslin for my vintage blouse. I figured out the front gathers on the shoulder pretty easily, sewed up the shoulders and the sides... and then spent about the next 2 or 3 hours reading two paragraphs of my pattern. Vintage sewing patterns being a little skimpy on the instructions (if not downright pithy sometimes), it probably worked out to about 45 minutes a sentence. Argh.

The issue in question was the construction of the collar. Probably not a difficult construction, but for some reason I just absolutely could not wrap my brain around the instructions as written. If I were an advanced sewist or had at least a few collars under my belt I would have been able to figure it out regardless of the instructions. As neither were the case, there I sat in the dining room. And sat and sat and sat, and wondered. And tested one thing, then the next, then stared at a sentence for the umpteenth time while muttering that boy, was I ever glad I hadn't lazed out and was actually doing this on a muslin!

I went to bed frustrated, having literally spent my entire night poring over something I wasn't able to figure out. That's usually the time when I'd curse and throw everything in a bag, perhaps never to see the light of day again. But I brought the pattern with me to bed. I looked at it while chatting with Mel for a few minutes when suddenly I shouted, "Oh my god I think I figured it out!!!" I raced out of bed, grabbed a sticky note and furiously wrote down some notes. (Because anyone who knits knows if you don't actually write detailed notes when you're working on something, instead thinking "oh surely I'll remember that..." knows this is never, ever true, no matter how many times to try and delude yourself into thinking next time will be different. This is especially true if you have to work two of something, like sleeves or socks.) There's only one more part I need to work out when I sit down to try it out tonight, but it's probably because my brain can't really sew in 3-D, despite my best intentions. Today, I ordered Clotilde's Sew Smart. I have a great vintage sewing resource book, but I happened across this book when I was Googling for collar tips. I found a few sample pages on Google Books and knew right away this was a resource I needed (and a used copy cost less than the price to ship it). My sewing library is still meager, so the more, the merrier!

In other sewing-related news, I'm going to join the Swing Dress Sew Along at Casey's Elegant Musings. Since I keep talking about wanting to sew my first dress, I figured I could use the extra encouragement of a sew-along. Plus, it sounds like fun! I do knit-alongs all the time on Ravelry and it's just fun to participate on the same thing with a bunch of others, seeing what changes people make, helping each other out (though in this case I know I will not be a helper but a helpee). I've ordered the pattern but I'm sure selecting the fabric will be the toughest part. I'd love a light cottony print, perhaps... something to remind me that Spring will indeed show up... one day.

Now, let's hope I kick some muslin butt tonight!

Tuesday, January 11, 2011

uniform sewing

This afternoon, I sat down to make a muslin. I admit that I'm really not a big fan of doing them anymore than I'm a fan of knitting a gauge swatch. But like in knitting, I know when I need to do one and when I don't. This weekend I finished up my blenders blouse and I'm extremely happy with it. (I hope to get some photos next weekend when there's sun.) I'd do a few things different next time, but I know I'll be making the pattern again and again. In fact, it turned out the neckline was high enough that I can wear the shirt to work, so that was a nice bonus considering yesterday's rant.

I love the idea of having a few 'uniform' sewing patterns to make wardrobe staples, and got the idea from my friend Brandy. A pattern that I really like, that fits me well, that I know how to sew and that I can whip out different versions of to make each one unique. I definitely know the pattern I used for the blender blouse will be my first uniform pattern.

So I'm working on a muslin for a second basic blouse pattern. I admit I didn't make one for the blenders blouse. But this time I'm going to, partly because I think the pattern size I bought might end up being too big for me so I may need to do some alterations, and partly because I've never done gathers at the shoulder before so I need the practice. It's a Simplicity pattern with no date, but I'm guessing from the hairdos perhaps late 50s or early 60s. Just a classic style. Even better, another work-appropriate one if it turns out well. Once the muslin is complete, if I get it to a place where I'm satisfied, I plan on ordering up a bunch of fabric to make myself 'uniform' blouses for work.

Making muslins are kind of a drag. But today, what was my biggest obstacle?


That's right. That's my muslin fabric under her butt. This photo was taken the third time I had moved her and moved the muslin. She was too cute to move again, so I just worked around her. Fortunately the ironed part that I needed was up on the table above her. It really only proved problematic when she changed position and my fabric started to scoot its way down to the floor.

Welcome to my sewing in my house!

Monday, January 10, 2011

Non sequiturs: Pasta sauce and business casual

I was initially planning to post today about the wonderful, amazing dinner that I cooked for us last night. For the first time, I made my mom's Italian pasta sauce recipe, which is probably very close to my grandma's recipe, which in turn is probably similar to my great grandmother's recipe. So if not in exact ingredients or steps, it's a sauce that's been passed down at least four generations. My great-grandmother died when I was very, very little, and I don't remember much about her except that she was an elderly woman who didn't speak English very well and who wore a lot of black. But the one distinct memory I do have is having a soft-boiled egg eating contest with her. So perhaps it's fitting that this amazing sauce has had-boiled eggs in it. (If you've never had pasta sauce with hard-boiled eggs, you don't know what you're missing. Really.)

Anyway, it took a year and two sessions watching my mom make The Sauce to have a recipe I could work with. Actually, that should read: a recipe that I didn't accidentally lose for a year. That's right. At Christmas a couple of years ago I watched my mom make the sauce, writing down meticulous notes. Which I promptly lost when I got home. Last year, I made her do it again, writing down more meticulous notes. Which I then put into Google Docs for safe keeping. Of course, as soon as I got home I found the original notes. Which is actually fantastic, because they weren't exactly the same and now I really have a good idea about the variations my mom does when she makes her sauce. In an ironic twist, today I was telling her about making the sauce and she requested a copy of the recipe I wrote down. Because I had left her a copy last year. And she lost it.

Oh wait, apparently I did just post about the dinner. But on to what I now really want to post about: a rant about work clothes.

I hate office wear. I hate business casual. I even hate the term. Yuck. I mainly wear a plain crew-neck t-shirt, a cardigan, and boring slacks. Nothing vintage, or retro, with the exception of an occasional vintage cardi. I've never really felt I could find a way to incorporate that into my work life. For four main reasons: 1) I have a lot of tattoos that need to be covered up. No dresses or skirts, no sleeves shorter than a hand-width above my wrist, no button down shirts unless they have a really high second button. 2) I've always felt it would be a little funny wearing vintage clothes in such a boring business casual environment. Probably because I've never been able to do it. 3) Being limited to pants, I must admit that I don't find high-waisted vintage or retro pants particularly comfy to sit in for 8 hours at my desk. 4) It gets really hot and muggy in Chicago in the summer, so I end up sticking with thin store-bought cotton cardigans, since all of my handknit and vintage cardis are wool or acrylic. And both those fibers make me want to pull my skin off when it's 90 degrees and humid in July.

With the new year, I thought it might be nice if I at least stepped up my wardrobe a bit. I bought a few nicer pair of slacks, a couple of new cardigans, a couple of button downs. Ordered online. I got most of it today, tried it on, and wanted to throw it all out the window. Perfectly nice, serviceable clothes, but I felt like a complete idiot in them. I hated the lower rise on the pants, the button down looked manly and weird, and every combo I tried I hated. I felt fake and weird and yuck!

So now I am completely down on work clothes, and I have no idea what to do next. I may just have to suck it up like office workers decades before my time and deal with sitting for hours in somewhat uncomfortable clothing (yes high-waisted pants, I'm looking at you). I may just have to button my shirts up all the way, even though I don't generally do that. But apparently I did on New Year's Eve at our friends' party, and that worked, right?


As for cardigans when it starts to get warmer... okay, that one I'm still stumped about.

I also think this all means I need to sew some lighter weight shirts to wear to work, since of course if I'm sewing it, I can put the buttonholes anywhere I please. But finding fabric may be a tough job for me. It would need to be light enough to work under a cardigan without being too stiff in sleeves (so it would fit smoothly under a cardi), or too stiff in general. I'm thinking some kind of cotton or cotton blend that's lighter than quilter's cotton. I have some adorable voile that I think wouldn't be too sheer enough to show tattoos with a cami underneath and paired with a cardigan, but I'm still a little scared to sew with it (mostly because I have no idea how you do facings when your fabric is sheer).

So... I think I need to stop being a lazy vintage enthusiast when it comes to the workplace. I can tell it's going to take some serious work, though!

Saturday, January 8, 2011

Pin basting a sleeve in a vintage sewing pattern

Yesterday afternoon I picked back up a sewing project that I had abandoned last Fall. I didn't do a lot of sewing last year, and I know that's due in large part to being an on again, off again sewist over the years, even though last year I was really determined to make it more of a habit. I didn't. I'm usually pretty adept at reading vintage patterns but sometimes my execution leaves something to be desired, and that left me frustrated last year. I'm determined to sing a different tune this year, however.

I've recently come to realize that a lot of my issues with garment sewing is due to my own poor fabric selections. (Let me just put this out there: the world needs to stop making so much stinkin' cute quilter's cotton.) A great resource that really helped me is the guide to sewing series of posts that Casey over at Elegant Musings did, which is tailored for the vintage sewist. Reading that really set the light bulb off in my head about making better fabric selections. I swear I'm going to put all my fabric that's not so perfect for garments in the back of the closet so I'm not tempted to use it!

Back to that sewing project from last Fall. Using, you guessed it, quilter's cotton. I mean, I couldn't very well resist a pattern with retro blenders on it, could I? I know now it wasn't a great choice, but rather than leaving it crumpled up sadly in a bag in the closet, I decided to try and see it through. Even if it means it'll be slightly too stiff and it'll wrinkle if you look at it cross-eyed. It'll still be cute.

But the real reason for this post is actually to share a great tip that I read about many months ago that I filed away for future reference. It's an alternate technique to setting a sleeve into an armhole. My pattern recommended, as do many people, to baste around the sleeve cap, then pull the lower thread loosely as you're pinning the sleeve into the armhole to distribute the ease. (And if you prefer that method, there's a great tutorial post over at Sew, Mama, Sew with lots of photos.) However, I read this post at Gorgeous Things (whose new blog is now here) about pin basting to set a sleeve into an armhole, so I tried it. And I loved it!

Of course, I didn't take any photos while I was setting the sleeve into the armhole, so you'll have to make do with a simulation.

Pin basting a sleeve:


Essentially what you do is turn your body inside out and your sleeve right side out as you normally would do, and begin to pin the sleeve into the armhole. First, I pinned together the sleeve and the body at the top and the bottom. I would say I pinned at the notches next, except when I cut out my sleeves I must have laid the pattern upside down so my notches were all off, so I didn't actually do that. I then started easing in the fabric into the armhole with pins. Lots of pins. Lots and lots of pins. More pins than I even pictured above. You don't need nearly as many pins towards the bottom of the armhole where there isn't as much ease, but you'll want to go just crazy with the pins at the sleeve cap. As you pin, carefully distribute the ease as you go.


And it'll take awhile. You'll find you often have to move pins around, getting the ease just right. And in some sections it'll be easier than others. I did one half of a sleeve in about 5 minutes, but I swear the second half took twice as long or more. If you attempt this method don't get frustrated, because the end result is worth it. (And honestly, it's probably not much more work than the method where you baste the sleeve cap first, anyway.)

When it was time to sew, I started at the bottom of the armhole and worked my way around, going very slowly on the sewing machine and removing pins as I went. As I got to the sleeve cap area I started really distributing the ease with my hands as I went, stretching the fabric from both directions, making sure I didn't sew in any creases. I admit I sewed over many of the pins because there were just so many. It's hard not to when you've got pins every 1/4" or so.

In the end, I had a perfectly smooth set-in sleeve! And in the photo below, I hadn't even trimmed the seam or pressed it yet.


And that's all there is to it! I felt it was worth the effort for the nice result, and I'll definitely do use this method again. Yay for new techniques!

Resources from this post:

Thursday, January 6, 2011

Happy New Year

I guess you could say it's been awhile since I've felt like blogging. Nothing happened, I just kept putting off posting photos from our Fall trip to Ireland and I turned around and bim, bam, boom! Suddenly it's 2011. Happy New Year!

While the holiday season has only just finished up, I feel I can still be justified in posting the Christmas sweater I knit in December. Last year (oops, now the year before last-- look how that pesky new year confuses you) I ordered the lovely little knitting book Vintage Gifts to Knit by Susan Crawford. You might recognize the name as one of the authors of A Stitch in Time, Volume 1 (and incidentally, Volume 2 is now available to pre-order). I naturally fell in love with most things in the book, and really wanted to knit her Perfect Christmas Jumper pattern in particular.

Much as I love fingering weight sweaters, I never got to it in 2009 and felt certain that I'd never get to it in 2010 either if I didn't toy with the pattern a bit. So I upsized it for worsted weight, a much more appropriate weight for my own particular Midwestern climate around Christmas.

All things considered, I made very few changes other than the dramatic change in gauge. I tried to keep my charts and pattern as faithful to the original as possible. The sleeve caps have a box pleat. Because I felt the similar type of cap on my Mildred Pierce cardigan featured in my last blog post came off my shoulders a bit too much, I made sure to decrease the shoulders in this pullover so that the cap would sit closer to my shoulder, and that worked out brilliantly. The cap is really ingenious-- you work decreases that (mostly) mirror the armhole decreases on your body once you hit the desired sleeve length, work to a couple of inches short of the height of your armhole on the body, then decrease until you have about 2" of stitches remaining in the middle, then knit a little flap for about 2 more inches. Then you seam the sides of the flap to the cast off edges just before the flap. Don't let my simple explanation fool you though, because I literally spent hours deconstructing the sizing on Susan's original pattern in order to reach that conclusion. I love the result and I'll definitely use it on future projects.


The other thing I love about this pullover is the back. There's a little button band at the top, which is a cute added touch. I used 4 round vintage buttons from my stash.


In this photo you can see that my short style is an illusion; my hair has grown quite long and I have it tucked up and pinned. It's actually several inches longer than I've had it in any kind of recent memory. I'm probably going to get it cut soon, to perhaps a modified long middy that's a few inches shorter than what I have now and layered so I can try out more vintage styles. But the length has been fun, and I proved to myself that yes, I can grow my hair long!

And just to get me back on the topic of knitting, my current sweater is coming along. Rather slowly, admittedly, as it is indeed in fingering weight--the short-sleeved Fair Isle Yoke from A Stitch in Time. Except, because I appear to be incapable of knitting something exactly as written, I'm slightly modifying the fit and I'll be using a completely different colorwork chart featuring hearts and clovers. I'm hoping to finish up a couple of short-sleeved sweaters for Viva Las Vegas in April, but knowing how I love to jump to other projects (and that I have some sewing I'd like to do between now and then, too), I'll be happy if I get Fair Isle Yoke completed by then.

Here's to a craft-filled 2011!

Friday, September 17, 2010

Ireland and Mildred Pierce

I haven't posted in awhile because I haven't had anything fun and finished to show off. I did indeed finish the top I wrote about in my last post, however the days I wore it were so ungodly hot and sweaty there was no chance of getting a decent photograph of it modeled.

The tides have turned, however, and Fall is in the air. I recently finished a sweater that I started in the heat of August and polished off as September started cooling down. Just in time, too. Because next week, we leave for a vacation we've been planning since the Spring, to Ireland.


I love this sweater. It's a pattern that a woman designed based on her friend's vintage sweater. If you're on Ravelry, the pattern is called Caitlin's Cardi. I call it my Mildred Pierce cardigan because of the 40s style sleeve caps that remind me of Joan Crawford. In fact, I haven't yet decided how comfortable I actually feel wearing such prominent sleeves, but I'll give it a try. (And yes, the astute cat lover will note the painfully ugly cat post in the background.)


The pattern also reminds me quite a bit of a pattern in a 1950 knitting book by Bear Brand Fashions, volume 341. It's called Westport.


See the resemblance? Actually my version looks quite a bit like this one, as I modified the pattern to give it full-length sleeves and I did the body in stockinette instead of the slipped stitch pattern it called for. I swear, I have the inability to knit a pattern exactly as written.

I love vintage knitting patterns but haven't actually knit very many of them. There are a lot of modern touches that I love in new knitting patterns (working in the round when possible, charted patterns, concise language). Let's face it, a lot of vintage knitting patterns are really tedious.  Plus there's an almost endless number of new patterns that have a vintage appeal to keep my fingers busy. So I admit, I do a lot more oogling of vintage knitting patterns than actually knitting of them. (Though okay, I do a fair share of knitting of them too... I guess that happens when you're an obsessive knitter and something you don't knit as often as something else you do knit still happens pretty frequently when you knit all the freaking time.)

Anyway, my emerald green sweater will accompany me to the Emerald Isle. I can't wait!

Friday, August 13, 2010

Invisible zipper triumph

I've been procrastinating on the blouse project I mentioned in my last post. I'm working on a slightly modified version of one of the tops in the vintage pattern Simplicity 3963. Just a simple little shell. I'm really trying to expand my sewing skills, so I decided I'd use this project to help conquer my fear of zippers. The last zipper I remember installing was in a pencil skirt I made about 7 years ago. Before that... might have been a dress I made in high school once summer when I was visiting my grandma. Clearly, I haven't had a lot of practice with zippers.

I've been picking the brain of my friend Heidi all week about zippers. She is a class A (as well as classy) seamstress and always has a good answer for my elementary questions. I read up a lot online about invisible zippers, which is what I decided I wanted to install in this top. It seemed daunting but I was ready to go for it. Having basted both seams and pinned the first side of the zipper in place, and after psyching myself up for the task, I sat down at my sewing machine only to discover that what I thought was an invisible zipper foot was a buttonhole foot. (I have sewn buttonholes recently, so I have no idea what I was thinking.) Drat.

Heidi assured me that if I were careful, I could still use my regular zipper foot to sew in an invisible zipper. I initially thought that sounded scarier than I was willing to attempt, but two days later and I was getting antsy. Goodness knows I'm used to having a million projects going at any given moment, but this one has been taking up the entire dining room table and damnit, it's hot here. I could use another sleeveless shirt.

So for about the fifth time I read through these instructions for inserting an invisible zipper and then used my Google fu for one more attempt to find a tutorial to help elucidate the process. Now, I'm not usually a big fan of video tutorials. In fact if you want the truth, I find it rather annoying that that days, half the time I want something written out I have to watch a video instead. But in this case, it ended up being this video that finally pulled everything together for me.

And I present you with my first invisible zipper.


And I'm completely happy with it! I didn't even end up with a bubble or gap at the bottom, either. I'm not fussy about the inside of my garments at all, so when I realized that on one of the sides my stitches were a little far away from the zipper coils for a couple of inches, I simply went over that area again, closer. No one will ever see the original stitches, anyway.

So perhaps this is a drop in the bucket for the more experienced sewers out there, but this was a big triumph for me. Now I don't have to be scared of patterns with zippers! (And I grudgingly admit... for all my worry, that was a lot less annoying than sewing umpteen buttonholes.)

But I know, I know, screw the zipper, you're really wondering about that chicken fabric, aren't you?


It's a feedsack that I bought awhile back. Feedsacks are often very expensive for the (almost non-existent) yardage you get, and when they are inexpensive they're often in poor condition. But I don't mind minor flaws, so you can see the lightest bit of yellowing in a few spots on this one (and it actually shows up more in the photo than in person). I  just love the patterns on feedsacks so much that on a rare occasion it's worth it to splurge a little for a great one. I definitely thought this qualified as a great one. Imagine a farmer's wife in 1940 trying to get enough feedsacks in this fabric to make herself a dress!

I bought this one fully intact (i.e. it was still an actual sack) so I had to unzip the seams along the side. You can see the holes along the selvedge on the bottom right side. I opted to use bias tape around the neckline and armholes instead of facings (because I like the way it looks, and maybe more importantly because I hate facings, and not in a fear-of-the-unknown kind of a hate, more like a I-really-really-hate-facings kind of hate), so I have a little bit of this awesome fabric left. I need to come up with something really small for the leftovers. I might be able to cobble together enough for a contrasting collar or pockets on something.

Hopefully I'll finish this over the weekend!

Tuesday, August 10, 2010

Hello, world!

How nice to see you again. Yes that's right, I've started up a new blog. I tired of redhotknitter.com about a year ago for no particular reason, so I wanted to give it a go with a new start that focuses on all of my interests, not just knitting (though there will be plenty of knitting, too!).

So let's have at it.

Say... what's that up in my header? A vintage sewing pattern, that's what.


Don't you just love vintage sewing patterns? For the most part they're really not much different than modern sewing patterns in terms of usability, but what a feast for the eyes. And of course, I love holding a piece of history in my hands. I particularly love if the pattern has little notes or scribbles, faded pen or tailor's chalk or other signs that someone actually made something from the pattern at some point. I think that's just the best.

I love the dresses shown in this Simplicity pattern from the 1950s. I admit, I love dresses in theory way more than I love to actually wear them (jeans/overalls/trousers/capris are much more my speed), but that doesn't stop me from collecting vintage dress patterns. I'm thinking someday I'll make a blouse from the top half of the pattern, instead.

I'm actually working on a blouse from Simplicity 3963 right now.


Now, the pattern is a little small but even someone with modest sewing skills such as myself can handle a little bit of alteration on something as relatively basic as this top. I'm lengthening it by 2" and making it a little bigger. Everything has gone smoothly so far and I hope to be sharing the finished blouse once I get the zipper in. Granted, this is the first year I've done much sewing in eons and I can't even recall the last zipper I installed.

Hopefully there won't be too much swearing involved.  (I make no promises. Dainty is not my middle name. Ask my mom.)
Related Posts Plugin for WordPress, Blogger...