

I hatched an idea born out of recent bad hair days: I wanted to create hair bows out of feedsack fabric. Feedsacks were the fabric bags used to hold grains, sugar, flour and such in the early part of the 20th century. They were around earlier than that, but people often associate them with the 1930s, when they were most used and popular. Women in rural areas would use the somewhat stiff, loosely-woven cotton fabric from the sacks their husbands brought home to the farm to make clothing and home accessories for their families. A wonderful example of recycling and making do!
The patterns on feedsacks are out of this world. Often brightly-colored novelty prints and beautiful florals. There's just something about the prints and the fabric and the history that I adore! Want to learn more? Feedsacks: A Sustainable Fabric History is a great read.
Now the problem with vintage feedsacks is that there's just not that much fabric in a sack. If you're creative on how you use it or get lucky enough to collect multiples of the same print, you can use it for clothing. For example, Lauren of Wearing History made a fabulous 40s playsuit out of feedsack, and Kim Stewart (AKA Nudeedudee on Etsy) has oodles of amazing feedsack prints in her Flickr set and sews wonderful vintage fashions with it.
But they can be hard to find, or expensive, or you might only find large scraps (possibly being sold to quilters as "fat quarters"). And if have an entire sack, you want to make the most of it! Even if you use the rest for clothing or quilting, you may have a bit leftover, and are looking for a project that uses just the weensiest amount of fabric. So I thought of a great way to use up feedsack scraps: make hair bows. I'm sure I'm not the first person to think of it... I bet some farmers' wives back then fashioned feedsack hair bows for themselves or their daughters, too!
There are oodles of bow tutorials online, but I wanted one that created a bow like a classic tied ribbon, with crisp cutout ends, so I came up with my own idea. I loved the results, and I whipped up this tutorial to share how I did it. The best part is these bows can be made with only 10" x 9" of fabric! Perfect for a small partial feedsack, or any vintage fabric that's precious to you, or just scraps to match an outfit you've sewn!


- vintage feedsack (or other small amount of fabric, about 10" x 9" or larger)
- small amount of fusible interfacing (light- or medium-weight)
- one hair comb (Grip-Tuth are fantastic for fine and thick hair alike—you can use a barrette if you prefer)
- one sheet of paper
- scissors
- sewing machine and sewing needle
- matching thread
- small amount of matching embroidery floss

Piece A — Fusible interfacing piece. This is the size of your finished bow. Everything else is based on this size.
Piece B — The front and back of the cutout ribbon part of your bow.
Piece C — The big looped part of your bow.
Piece D —The smallest piece that wraps around the bow in the middle, giving it the distinctive bow shape.
You'll cut these 4 pattern pieces out of a sheet of paper. Because it's fun to make bows in different sizes, I write on my pattern pieces how to measure for the size of that particular piece, so you'll see my notes along the way. This makes it easier if you come back later and can't recall how to re-size your pattern pieces for a new bow.

Decide how big you'd like your finished hair bow. After trial and error, I came up with 5" wide by 1.5" tall as a versatile size. For the sake of this tutorial, we'll use these numbers throughout. So when I say you need a piece of feedsack at least 10" x 9", that's for a finished bow of 5" x 1.5".
Cut Piece A
Cut out a piece of paper the size of your bow. In this case, 5" x 1.5".

Not sure the best way to cut those inside corners so they're perfectly the same on both ends? On one side, mark where you'd like the inside point. Fold your piece in half horizontally, then vertically, and snip off the ends together.

Mark it Piece A. You will cut one piece of fusible interfacing this size. (If you choose to use sew-in interfacing, you won't actually use this piece to cut anything out, but it will still be helpful to have it in the next step.)

Cut Piece B
Lay Piece A on your paper. Cut Piece B exactly 1/2" larger than Piece A on all sides. The larger sizes accounts for a 1/2" seam allowance. (No, you don't have to worry about the ends being pointy, as this is in the seam allowance and will be trimmed away anyway.)

Mark it Piece B. You will cut two of this piece in your feedsack fabric.

Cut Piece C
Piece C will form the long looped part of the ribbon. Cut a rectangle that is:
- width: Twice the width of the inside corner to inside corner of Piece A plus 1" for seam allowance.
- height: Twice the height of Piece A plus 1" for seam allowance.

- My width: Inside corner to inside corner of Piece A is 4", so 4 x 2 is 8", plus another 1" for seam allowance. Width = 9"
- My height: Piece A is 1.5" tall, so 1.5 x 2 is 3", plus another 1" for seam allowance. Height = 4"

Mark it Piece C. You will cut one piece in your fabric.
Cut Piece D
Piece D (last piece!) will be the little piece that wraps around the center of your bow. Decide how wide you want that to be. On mine, I liked 7/8".

Cut a rectangle that is:
- width: Twice the width you decide you'd like that piece to be.
- height: Twice the height of Piece A (no seam allowance needed).
- My width: Twice the width I'd like, so 7/8" x 2. Width = 1.75"
- My height: Piece A is 1.5" tall, so 1.5 x 2. Height = 3"

And you're done with your pattern pieces!


This is probably the easy part after making all those pieces! Press your fabric. (Not too much, you don't want to scorch it, so use a press cloth. You'll see why I said this shortly.) Cut out your fabric and interfacing as instructed on each piece. As a reminder, that's:
Piece A — fusible interfacing
Pieces B, C, D — feedsack fabric
(If you are using sew-in interfacing, don't cut out Piece A. Instead, cut one Piece B in your interfacing and remember your seam allowance is 1/2".)
On one of your two Piece Bs, lay your fusible interfacing piece on it, centering it. Make sure the gluey side of your interfacing is down. Press to fuse the pieces together.

With right sides facing, pin together both of your Piece Bs. Mark about 2.5" to leave open so you can turn your piece inside out. I used blue tailor's chalk.

Because the interfacing is exactly 1/2" smaller than your fabric pieces, sew them together along the edge of the interfacing, backstitching at the beginning and end. Easy, peasy. No need to eyeball around tough inside and outside corners! Just follow the interfacing. Plus, this will make a nice, clean edge for pressing, it makes the points a little more crisp once you turn them, and gives a bit of body to the bow. Win, win. (If you use sew-in interfacing you won't have this built-in guide, so you might want to mark inside and outside corner's with tailor's chalk to easily keep to you 1/2" seam allowance.)
When sewing, with your needle in the down position, raise your presser foot at each corner and pivot the fabric to the next position. I'd recommend taking smaller stitches at the outside corners (the pointy bits), because it will help when you're later finagling them into position.

Tip! Leave one thread long at either the beginning or end of sewing these pieces together (remember, you leave a 2.5" gap open to turn the piece right side out). You can then use it to sew up the gap when you turn it right side out.
Press, and trim seam allowance to 1/4". I like to keep a little extra on the open part because it's hard to fold in a scant 1/4" of feedsack!

Trim corners diagonally. I like to clip a couple of spots along the diagonal edges and most importantly, the inner corner. Don't accidentally clip into your stitches! I roughly do it like this:

Turn right side out. To push the points into position, I first use my fingers from the inside to push as far as I can (not very far). Then I alternate between pushing with the blunt end of my seam ripper from the inside and pulling gently with the end of a pin from the outside. Be really careful with the pin so you don't snag the fabric. Take your time, it'll be worth it.

Fold in the extra bits of fabric at the gap, press, and slip stitch closed with small stitches.

The most complicated piece is complete! Now for the easy stuff.

Fold piece C lengthwise in half and sew along the long open side using a 1/2" seam allowance. Press and trim the seam.


Fold one raw end in about 1/2", and slide the other raw end into this end about 1/2", forming a loop.

Before stitching it shut, you'll want to eyeball it on top of your finished Piece B so you can decide exactly how you want to sew it shut.
The 1" total seam allowance given should be just right (1/2" folded in on one side and 1/2" tucked into that end on the other side), but decide what you like best. Then sew it shut. (My stitches are uneven, but this won't show.)

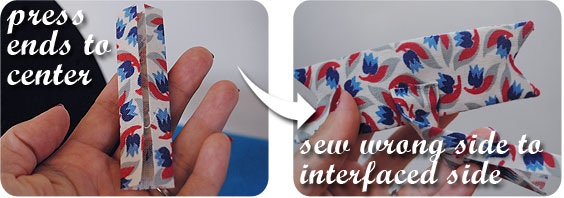
Now onto piece D. Press the sides of Piece D to the center, and sew the wrong side of one end of the piece to the interfaced side of Piece B, right in the center. (Remember, only one side was interfaced. This will be the back side, and where you want your seam.)
Time to put all the pieces together! Wth the seam at the center back, lay Piece C onto Piece B. Wrap Piece D around the center. Depending on if you'd like your bow pieces to be very flat or kind of scrunched up a bit in the middle, you can maneuver your pieces around while wrapping Piece D. (I like it slightly scrunched.)
Tuck the raw edge of Piece D under at the back, and stitch into place. (If you pulled it really tight, you can always snip off a bit of the end of Piece D if you have too much excess now.)

Almost done! Using 3 strands of embroidery floss, sew your hair comb to the back of your bow. Pull the needle up between the tines. (Going the other way with your needle is almost impossible.)

Done! You now have your very own adorable hair bow out of a scrap of 1930s feedsack fabric. Go off and make a bunch more!

Wear it however you'd like. It's perfect with a 30s or 40s set...


Or make a slightly larger one to adorn a bun or updo. This one was made with scraps from my New York leaf dress last summer.

Or add one to the side of a roll...

Style it however you'd like. If you make one, please do let me know, I'd love to see it!
Hope you enjoyed this tutorial!


