

Today, let's talk about how to keep your stranded knitting nice and even looking! I'll cover a few things that tie together to make that happen, and give you my best advice for lovely looking stranded knitting.
Tension
You may or may not find that your tension changes from knitting with one color to knitting with two colors. Many people say your tension tightens up when you knit stranded (producing more stitches per inch than when you knit with one color), or that you get more relaxed as you go. You won't really know until you try it out for yourself.
Using the same yarn, my gauge is pretty much consistent whether I'm knitting with one color or two. What's this all mean? That you will need to do a gauge swatch for a stranded knitting project. Period, end of story. It's okay though, because you'll want to do one anyway to make sure you like how your colors play together. (We'll cover that in another post soon!)
Floats and puckers
When you work in stranded knitting, only one color is being used in a stitch at a time, obviously. So the other color waits for you at the back of the work, to get knit with the next time it's needed. That strand of yarn between the stitches of a given color is often referred to as a 'float'.

So each little float is what makes up the stranding, when you talk about stranded knitting or fair isle. It's that stranding on the wrong side of your knitting that gives stranded items that particularly squooshy feeling and makes stranded knits thicker than normal knits.
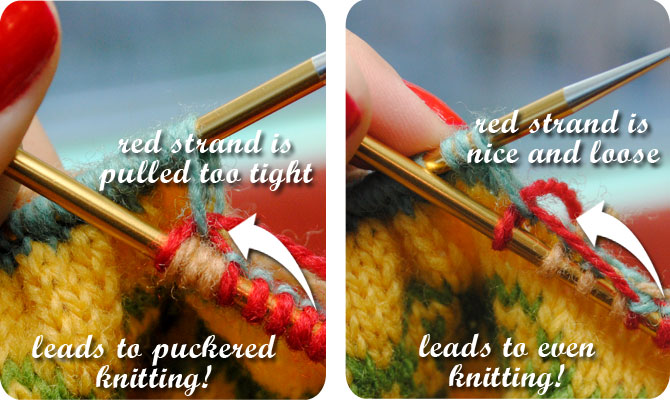
You want to make sure that your floats are not too tight. I can't emphasize that enough.
How? When you stop using color A and start using color B, do not tug tightly on that strand of yarn or you'll pull your float too tight. If you do that, your work will end up puckered. You can block some of this out, but you simply can't beat your knitting into submission, much as you may try.
When you go to knit with the next color in your pattern, knit that stitch but don't yank on the yarn to tighten it up, just keep it nice and loose. That will help keep the float loose at the back of the work, ultimately leading to nice and even colorwork. Because it's worth repeating: you want the yarn at the back of your work to be carried along loosely. You can always tighten up a stitch or two here and there but it's almost impossible to loosen up floats that are too tight. Really!
I pulled out an old work-in-progress to show you a comparison. This isn't an extreme example, but you can kind of see the puckered part from the strands between the red and black colors being pulled too tightly as I knit. (This project was on double-pointed needles, not my favorite way to do stranded knitting. Hence this being a WIP a few years later.)

Now, don't panic—your work may be a little puckery looking as you knit it. That's okay, and will block out. (Actually the above might even block out, but it's best to not chance it.)
Take a look.

But if your work is severely puckered, it's time to relax a bit and loosen things up.
My secret to even stranded knitting
I've been thinking for weeks about what I do to keep my stranding nice and even, and I've really only come up with one little trick, but it's the best tip I can give. It's so easy, too!
I think some people have a tendency to scrunch up all the stitches close together on the needle when they do stranded knitting. Here's what that looks like, with the stitches on the needle in my right hand scrunched up together, i.e. the stitches that just got knit.

Don't do this.
Instead, when you're knitting, keep the stitches on your right-hand needle slightly spaced apart. Give them some breathing room.

It's easy to do with a little motion of your right hand or fingers every so often to keep things spaced apart a bit. It helps give extra room for your floats and it helps keep you from pulling too tight. If you find you don't have enough space on your knitting needle to do this, switch to a slightly longer needle.
When you get to the next color in your row, make sure those stitches on your right-hand needle are nice and spaced apart.

You can see the difference in how the floats (strands at the back of the work) look when you do that, too.
This also must be done when you go from one needle to the next when knitting with double-pointed needles (DPNs), or knitting with 2 circular needles. Your floats between the needles must be kept loose, otherwise you'll get a pucker between each needle.

And that's my main advice for lovely and even stranded knitting. Don't knit it with a vice grip, and make sure your stitches are nice and spaced apart, especially between color changes. And remember, all the small puckers and wrinkles will smooth out once you block your knitting. Keep these tips in mind and you'll churn out beautiful stranded knitting projects.
In my next post (which will be very soon!), I'll talk about dealing with vintage stranded patterns that do not have charts, how to chart them to save yourself oodles of time and frustration, and how to work with charts easily. Then we'll talk a little bit about colors and yarn, and swatching!
Now do you have tips for what keeps your stranded knitting looking great? Please share in the comments!
This is fantastic!! Great pictures! I am so glad you are doing this, it's truly inspiring me! Are those "Signature" needles?
ReplyDeleteI look forward to your next post!
YAY! Excellent post, as always. :)
ReplyDeleteI already spied some things I was doing incorrectly which was leading to some slight puckers on my first (& currently hibernating) stranded vest. I have a tendency to run before walking so perhaps my new color stranding project should be smallish and not a whole sweater. heh
I can't imagine how much time it took you to put together this post... The colors in the images are so vibrant and I love the side-by-side images with 'right' and 'wrong' along with the handy text within the images. YOu have mega blogging skills! :)
My new years resolution is to try fair isle knitting so this post was hugely helpful, thanks! Your cardigan from the last post is just beautiful, cant believe you made that, such skill! :)
ReplyDeleteThanks so much! This was so wonderfully informative. I've been a little nervous about trying stranded knitting, but I think this may have convinced me :)
ReplyDeleteYou are such a knitting pro! <3 I wish I was better!
ReplyDeletex
Lost in the Haze
Thanks everyone!
ReplyDelete@knittyknoddy Yes, those are Signatures! I do love them, although I'm starting to like Chiagoo red lace needles even better for colorwork, since the cable is a bit more stiff and keeps the work held nicely while I knit.
@zilredloh Thanks, Liz! I really appreciate the kind comments. I have been working on making my tutorial photos as helpful as possible!
I always loved Elizabeth Zimmerman's tip- which was similar to yours. She recommended that as you switch colours you actually pull your right hand needle stitches to the right a little to increase that float size.
ReplyDeleteI too have the dpns issue- I did the first of my Christmas stockings on them and there is a definite tendency towards puckering. I am pretty sure it will block out when I get around to blocking it ;) since it is slight- but you can see the contrast to the stocking I knit on a 16" circular instead- the circ stocking came out WAY bigger LOL
I have been trying to aim some of my blog readers this way whenever they comment on wishing they could do stranded work as in my stockings :)
I used to have a heck of a time with puckered stranded knitting as I'm a very tight knitter. Two things solved my problem. The first is spreading out the stitches on the right hand needle as you show. The other is catching my floats every 2 or 3 stitches so my floats aren't very long. I'd be interested to know if you do this also, or how long you'll let a float get before catching it.
ReplyDelete@Betty Crafter Good question! I honestly don't catch floats unless there is a really long space between stitches. Something like 11 stitches in fingering weight, for example. I know some people do it as frequently as every couple of stitches! I also only try to catch a float in a spot where the same/similar color was under that stitch in the row below, otherwise my 'catch' had a tendency to peek through on the right-side of the knitting.
ReplyDeleteThanks so much for all the great advice and tutorial. I love your knitting needles! I never thought about the scrunching up thing but I will definitely try out your tips! XxxX http://thesecondhandrose.blogspot.com/
ReplyDeleteThank you so much for this tutorial! I am making a Christmas sweater for my sweetie that I wasn't looking forward to as much, mostly because my flats are always too tight. I tried this technique today and it looks soooo lovely!
ReplyDeleteThanks again!
Belated reply... if I'm in an area where I'm worried that my float will be too tight, I'll work a YO in the middle of the float with the floating color, then drop it on the next row. I usually do this if I plan to catch it on the next row: I work that YO right next to the one I want to catch it on, then on the next row I just drop it over. The YO gives me the extra length I need so that the added height doesn't pull it too tight.
ReplyDelete@kalany - Neat tip, I'll have to try that some time!
ReplyDeleteSuper helpful tips - thanks for that!
ReplyDeleteLet me start by saying how much I like your site. Love the look of it, the photos are gorgeous and the feel of it is nostalgic. I discovered it when searching for stranded colorwork help. Yours is the first thing I clicked on and I've had to look no further. The above article was exactly what I needed to get me on my way to starting stranded colorwork. Thank you so much!
ReplyDeleteKristie B
I have a question: I'm currently working on a glove, and I'm using red and black. The thing is that, I used black and red so often on 7 rows, that the floats are pretty small. Then, my pattern switches to 7 black, and then 1 red, creating a really big float, and then, I ended up having to knit red halfway through the row, and then add a few black stitches in the middle of the row, which created an even bigger float than the other ones. I was wondering if there's a way to make the floats neat so that when I put on my glove, my fingers won't entagled with the huge floats.
ReplyDelete