Monday, November 26, 2012

How I do a vintage back roll using a scarf

Hello my dear readers! I hope those of you in the U.S. had a lovely Thanksgiving. I know I did!

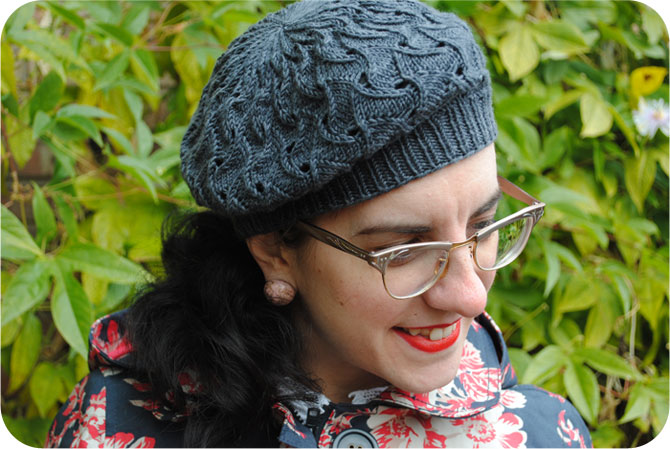
Today I'm excited to share a quick hair tutorial with you. I love the look of a 1940s-style back roll. It can be an elegant evening style or wartime factory worker casual. There are several great tutorials for this type of hairstyle, including at Va-Voom Vintage and Eileen's Basement. My version is a little different, as it doesn't use a rat to form the roll, but a scarf instead. So this hairstyle is a little twist on an old favorite.

I whipped up this style a couple of weeks ago on a particularly blustery day. I just needed something quick and easy for running errands and I knew my second day set would look like crap blown about in the wind. I'm sure many women in the 40s sported versions of this hairstyle. In fact Lauren Rennells does a lovely scarf roll style in her book Vintage Hairstyling using a different technique, a hot roll set and a front updo, but my take is a bit more casual and less involved, and can be done on un-styled hair. And it barely takes 5 minutes!


This hairstyle works best on un-styled hair or second day (or older) curls. I don't recommend it on freshly set hair as the curl tends to make the roll look more sloppy. In these photos, my hair had been wet set with foam rollers two nights prior and was slept on with no rollers the night before the tutorial, leaving me with loose curls.


  • hairbrush
  • several bobby pins
  • a pretty scarf


Start off by brushing your hair well. If your hair was set, brush out as much of the curl as you can. Soft waves or loose curls will be just fine.

If you have bangs, now is the time to style them as you'd like. (By request, I plan on doing a curled bangs tutorial soon!)


As you go, smooth down your crown. (This is also my attempt to tame the truly un-tameable whorl at the back of my head.)


Roll up your scarf (diagonally to get enough length, if it's a square scarf) until it's a few inches wide. Holding the ends in your hand, place it at the base of your head, pulling the ends up towards the top of your head.


Tie it in a knot at the top of your head, rather tightly.


On either side of the knot, place a bobby pin back to front, anchoring the scarf to your head. This is especially important if you're using a slippery scarf, otherwise it will never stay put.

(You can later remove these as needed, or hide them better.)


Grab a small section of hair (one or two inches wide) at the very side of your head. Pull it up towards the crown of your head.


Tuck it down under the scarf and tug gently to pull the hair all the way through.


Adjust the hair to neaten it up slightly, but don't put in any bobby pins at this point.


Repeat on the other side. It should look like this...


Grab all the rest of your hair...


Take that hair, and start tucking it into the scarf. There's really no precise way to do this, just start shoving it in until it's all tucked in. Each time I do this I never think it's going to work, but like magic, it does.


And what you get is a back roll!


Now is the time for bobby pins. (Do not use bun pins! You need the grip of bobby pins.) Slip pins inside the top of the roll, where it meets the base of your head. Try to grab a bit of hair from the roll and a bit from the base of your head.

The important thing here is to place your pins as shown below. If you place them like shown in the photo on the left, it will anchor the roll in place. If you do it like the photo on the right, it basically won't do anything except jab you in the nape of the neck when you tilt your head back.


(Note: I'm a leftie, so my arrows are going left to right... if you're right-handed, you'd just be doing it right to left.)

You're done here, except tidying up. If you have any loose bits that poke out, tuck them in and anchor with a pin. Feel free to use a little pomade or hair spray. At this point you can either re-tie your scarf if it loosened up or tie it off into a bow. Whatever you'd like.


The end. Now go about your day with your quick new hairdo and be merry!


Sunday, November 18, 2012

Fall day trip

Last weekend, it was so warm that we decided to get in a small road trip to Wisconsin. It's one of our favorite things to do, and this year with buying the house and settling in and everything that comes with that we've had very little opportunities to do it. So with temperatures 20 degrees warmer than earlier that week, we hit the road in style.


Outfit details
dress: made by me
1940s alligator shoes: Randolph Street Market
cardigan: knit by a friend
scarf: somewhere or other
locket bracelet: handmade by Made with Love SV on Etsy
modern wool coat: bought in Ireland on the high street


We spent the day in and around Kenosha, and had lunch at a cute little café, the Secret Garden Café and Gallery. We found it thanks to sitting in a parking lot by the lake and looking for Yelp reviews nearby... ah, the wonders of technology.

I had tasty tomato basil soup and a grilled cheese sandwich which looked like a heart.


They had something called a Little Free Library in the entrance way. I love projects that promote literacy. You can even get plans from them to build your own!


Along with a used bookstore stop, where I found a 1960s copy of the Bishop Method of Clothing Construction, we went to an antique mall and picked up an ornate mirror and a few small antique prints for our bedroom. I'll have to photograph them when we eventually paint and decorate the bedroom and hang them all up, but the room is quite lackluster still.

Did I mention what was outside the antique mall? Actually this pig had a couple of friends with him as well (not including Mel of course).


We also took the opportunity to revel a bit in the amazing autumn colors in a park. This is one of my favorite pair of shoes lately, 40s alligator pumps.


The bench just matched the leaves so perfectly.


We saw a jeweler in town that had amazing relics in the window from its long history.


I loved these vintage ring boxes in particular. I definitely need one like in the middle or on the right!


I couldn't miss the chance to pose on the stairs of this amazing side entrance to a church, it looked right out of Europe to me.


All in all it was a lovely way to spend one of the last hurrahs of fall!


I hope you've been finding ways to enjoy it, too!

Thursday, November 15, 2012

Pressing gratitude!

I can't thank you all enough for the loads of helpful comments on my pressing dilemma, with the fabric that just wouldn't crease! Of course I've now read several discussions about gabardine being hard to press.

In the end I was able to get it to work with a combination of your suggestions. I think the big winner, however, was Rebekah of St. Gemma's Art & Needlework, who recommended a spray bottle with 2 parts water to 1 part white vinegar. In the past I remember reading that vinegar is useful for removing stubborn creases (like if you lower the hem of a skirt... not that a shortie like myself has ever had occasion to do that). I had no idea it was helpful for setting creases, too. Once I added that into the mix of techniques I was trying I could see the light at the end of the tunnel.

Behold.

boy, dress forms look strange with no arms

Tools I used to get there:
  • one part white vinegar in a spray bottle with 2 parts water
  • my non-fancy iron set to wool and lots of steam
  • a piece of wood as a makeshift clapper
  • a press cloth
  • understitching in some places (which didn't end up helping)
  • sticktoitiveness
Yeah, that last one was the most important. I first spritzed lightly with the vinegar and water. Then through a press cloth, I pressed, let the iron up and let it steam the fabric, pressed again, let the iron up again and let it steam the fabric, then pressed again. Then I held the block of wood down on the pressed seam for several seconds (the wood conveniently had a narrow side and a wide side), then let go and let the fabric cool down. I repeated where needed, which in the case of the facing was a few more times. Oh and yes—I tested this all out on a sample seam with scraps, first.

It's not perfect, no, and there are other things that bug me about how this is coming together, but I can deal with all of them. I wasn't going to be able to deal with a puffy facing and collar.

100 times better than it was before, don't you think?!


Thank YOU for helping me get there!

Tuesday, November 13, 2012

Help, sewists! I can't press my fabric

My dear sewing friends, I have an issue and I need help!

By the way, the yoke is gathered, even though it looks like a big pucker in this photo.

As if I didn't have enough problems with the bodice already. Seriously, the place where the collar and yoke joins is beyond the laws of physics—or at least my sewing skills. And the collar is bizarrely short at the back of the neck and I worry it won't roll properly. But all that aside, another so far unsolvable problem has surfaced: I don't think I could press a crease into this fabric if my life depended on it.

I'm sewing a 1940s dress from a brownish wool blend gabardine from my stash. I don't know the exact fiber content, but it refuses to press a crease. Very unfortunately, I didn't really think about this until it mattered most, at the collar and facing.

What to do, what to do? There's no way this will ever look good unless I can sharply press the collar and facing. Is there a tool I can employ? Would a clapper help? Are there any great tips from the annals of sewing history? I'm not even sure I could press it enough to topstitch the very edge.

I hope this dress isn't doomed to failure, though I think it is.

Good thing I could use a brown skirt...

Monday, November 12, 2012

Matching gray beret & fingerless mitts

When I was leaving for Rhinebeck back in October, I needed a small, portable knitting project. After all, I was headed to a sheep and wool festival, flying on a plane and doing some traveling by car, so I knew there would be knitting time.

I finished these fingerless gloves the weekend I was there. The pattern is Arctic Blast Mitts (Ravelry link), knit in dk weight so they work up fast.


Aren't they lovely? 

But I also needed a hat to match. I always say I look a bit like a hobo when wooly season sets in, with unmatched hats, gloves and scarves. Perhaps I should say it's boho, that sounds like I did it on purpose, doesn't it?

Anyway, you see why I needed a matching hat.


It being, well, me, I went for a beret.


The pattern is QL Slouch (Ravelry link) by Wooly Wormhead, a talented hat designer who recently came out with Classic Wooly Toppers, a book that looks to have several hats that the vintage knitters among us might enjoy.

The pattern was very simple and enjoyable. And while it was for a slouchy hat, I was able to block it into a beret using a dinner plate. (It's actually meant to be reversible if you don't block it into a firm beret shape.)


I did say matching, didn't I? By matching, I meant they really don't match at all, they just use the same yarn.


Both were quick knits, and already getting lots of use!


Any accessories on your needles this fall?

Wednesday, November 7, 2012

An autumnal outfit

One thing I have been downright terrible about this year is outfit posts. I really need to be better, in part because it gives me an excuse to wear something on days I don't otherwise have a reason to force me out of casual jeans and a sweater. So here you go, a little outfit post, inspired by yesterday's post.


This is one of my favorite skirts. In fact, it was in part re-discovering this skirt in my closet that sent me cooing over skirts, blouses and trim little cardigans. Actually this cardigan is my single entry in the 'trim little cardigan' department, believe it or not. But I'm working on that, here's one of the ways...


I'll be knitting up a cardigan with two strands of fingering weight in a yummy color for fall, which coincidentally matches my skirt. And back to that skirt. It's the perfect fit, the perfect length and a fabulous print. Aztec? Or inspired by ancient Rome? Who knows. Boy did they do novelty prints right back in the day.

The skirt is pleated all along the waistband and I have a vintage sewing pattern exactly like it, which I sewed up into a novelty print skirt that I wore to Viva Las Vegas last year. I was disappointed with how that skirt looked in photos so much I've never worn it since, but now I think I can chalk it up to a bad bra and belt choice, believe it or not. Amazing how simple things can make such a difference! And now I totally want to sew up that skirt pattern again.


You can't tell how craptastic my hair is looking lately. Grow or cut? I can't seem to decide. So I've been wearing a casual ponytail a lot, but it's now warm hat season here, and the two don't mix. I'm tempted to cut it short enough that I don't have to bother setting it when I don't want to, but fear I'll regret it.


Yes, it's warm footwear season as well.


These booties were purchased last year when I was desperately trying to find non-ugly early winter boots. I think they're pretty darling, though the warmth is mostly just for show—the faux shearling is only on the outside. My feet get cold easily and sadly I know we'll soon be sinking into the season where I'll be wearing mostly fugly-but-toasty sheepy boots. Although inspiration just struck: I think I should knit some warm ankle socks to hide inside these!

Ah, the joys of a Midwest winter. At least I can look cute on top!


Outfit details: 50s skirt from Knee Deep Vintage, cardigan from Simple Thrift, acorn charm bracelet from eBay, blouse and belt from somewhere or other, me-made earrings from vintage cabochons, Sam Edelman boots


Related Posts Plugin for WordPress, Blogger...