Showing posts with label vintage sewing. Show all posts

Friday, August 16, 2013

Fall for Cotton: a vintage sew-along

Today is an exciting day!

Rochelle and I have been putting our heads together for awhile now, and you may have seen a hint or two here and there, but we're ready to let you all know about our newest sewing collaboration.

Lucky Lucille and By Gum, By Golly present... Fall For Cotton: a vintage sewing challenge for the cotton lover!

This is a sew-along for those of you who, like us, love sewing vintage styles and think cotton fabric is amazing. Don't think of it as a sewing competition, but as a fun way to challenge yourself. Limit your fabric choices, sew a vintage style, meet a deadline, and make some new friends!

Intrigued? Great! Here's the scoop.


Any vintage decade from the 1920s through the 1970s is fair game. But you're only allowed to use fabric that is 100% cotton. You heard right! It must be 100% cotton.

There are lots of varieties of cotton you can choose! Quilting cottons, flannel, twill, corduroy, voile, broadcloth, sateen, and chambray (to name a few) are all great options. Get it? If it's cotton, it's all good!

This sewalong will work much like how Rochelle ran the wonderful Sew For Victory sewalong. You can pick your own pattern and work at your own pace. You can use a vintage pattern, a reproduction pattern, or any modern pattern that helps your recreate your vintage look!

When's the kickoff? Well, that's today of course! That gives you about two weeks to gather your supplies, so you can be prepared to start sewing on the 1st of September. Although it doesn't matter when you actually start sewing, as long as you have your finished project photographed and uploaded to the Fall For Cotton Flickr Pool by the end of Monday, September 30th.

We encourage everyone to join us on Flickr and upload photos of your inspirations and your progress, and get involved in the discussions all along the way! Use the hashtag #fallforcotton on Twitter and Instagram to check in with your fellow sewalongers and show off what you're making! We'll be posting some inspiration and helpful hints, so be sure to follow along on our blogs.

So are you excited yet?! We certainly are! Here's the low down:
  • Join the Flickr group Fall For Cotton and introduce yourself in the discussion
  • Pick a pattern that helps you recreate a garment from your favorite vintage decade: 1920s through 1970s 
  • Pick any fabric that's 100% cotton 
  • Start gathering supplies now, and plan to start sewing on September 1st 
  • Have your finished garment photographed and uploaded to Flickr by the end of Monday, September 30th 
  • One finished project = one chance to win some awesome prizes at the end of the sewalong! 

Now grab a button and spread the word!


Fall For Cotton Button - 300 px wide
 SFVlogo250
Code for 300px button, copy and paste this in your sidebar.

 Fall For Cotton Button - 200 px wide
 SFVlogo180
Code for 200px button, copy and paste this in your sidebar.


Remember, this isn't a sewing competition. This is a fun way to challenge yourself by limiting your fabric choices, sewing a vintage style, meeting a deadline, and making new friends!

Join us and let's have some fun! Are you in?!

Tuesday, August 6, 2013

Giveaway! Mrs. Depew digital vintage patterns

I've got something fun for you today—a giveway! Yay!

Yesterday, you got to see my accidental playsuit, the top of which was made using the Mrs. Depew 1950s beach bustier pattern. Thank you for all the compliments! Because I had several comments about one particular aspect and forgot to mention in the post, I should clarify that I was not wearing a bra with my beach top. The top itself was doing all the work...which is some work. ;)

Now, good news for one of you readers out there! The lovely and talented Anna, the woman behind Mrs. Depew Vintage Patterns, has kindly offered to giveaway a digital copy of her 1950s style beach bustier top pattern that I used to make my own polka dot beach top, plus one other digital pattern of the winner's choice!


With the beach bustier top pattern you could make your own summer playsuit like I did, or draft it into a gorgeous tiki dress like Brittany of Va-Voom Vintage did!

And for your second pattern you could stick with the 50s, go for a 1920s flapper look, try out a lingerie pattern like tap pants... you name it!


1. Go to the Mrs. Depew Vintage Etsy shop and pick the second pattern you'd like if you're selected as the winner. Come back here and link to it in your comment.

2. Please include your email address in your comment if it's not obvious on your blog.

3. You can get up to 2 extra entries by pinning a Mrs. Depew pattern on Pinterest, or by posting about this giveaway on the social media outlet of your choice, linking to this post. Then come back and leave a separate comment saying which of those you did, with a link. If you do two, leave two separate comments.

These patterns are digital and this giveaway is open to anyone in the world. Winner will be drawn at random.

The giveaway ends Friday evening, August 9th so get your entries in!

Good luck!!

(Comments now closed.)

Monday, August 5, 2013

The accidental vintage playsuit

We haven't visited sewing in awhile, have we? Truthfully, I haven't had much time for sewing lately! I have one or two things up my sleeves, and that's been taking up a lot of time. I finished this top over two weeks ago and haven't been able to touch my sewing machine since. I've barely had time to check my favorite blogs and I'm woefully behind on email. Ugh!

But enough about things I can't talk about, how about something I can talk about? This accidental playsuit!


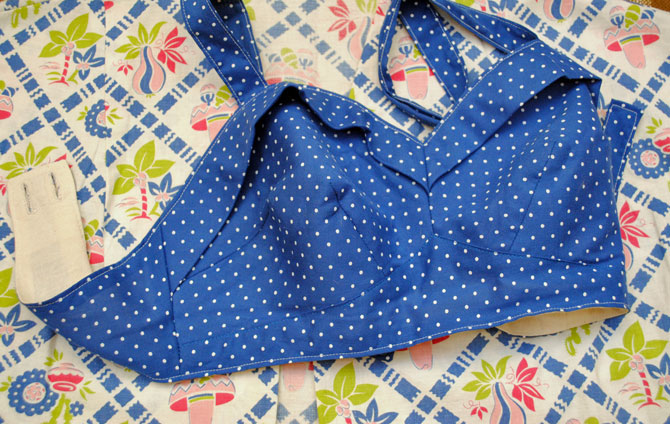
I sewed this polka dot dirndl skirt in June, from 1940s Simplicity 4496. A few weeks ago, I bought the Mrs. Depew 1950s-style beach top halter pattern from her Etsy shop. You already know I'm obsessed with halter styles this summer, and this was my first foray into sewing a halter top. I'm not a big PDF pattern gal, but this one is small, so the cutting and pasting is minimal!

And my opinion on the result? A big hell yes, thankyouverymuch.


Seriously, I love this top! Having never sewn anything like it, I went into this considering it to be a wearable muslin. I still had lots of this fabric left from the skirt, so I thought it would be cute for the top, too. I didn't go into it thinking about it as a full matchy matchy outfit, but about halfway through I realized hey, this is a playsuit in the making!

(Wait wait, can I stop here for a second and also say how much I love my new Luxulite necklace? I used to wear necklaces all the time and then recently realized I'd almost completely stopped wearing them over the last couple of years, so I'm trying to make up for lost time. More novelty necklaces in my life, please!)


My fashion fabric was a lightweight cotton so I interfaced the bra trim (called for in the pattern) and bra cups (not called for in the pattern). To add a bit more stability, I used a mid-weight muslin as my lining. The top was pretty easy to put together, and I think a confident advanced beginner could even give it a shot! You essentially put the bra part together twice—once for the outside and bra trim, and once for the inside lining. Then you sandwich in the straps, sew the whole thing together with the right sides facing, turn it inside out and top-stitch.

The end result is a beautiful, easy and professional finish! Well beautiful and professional except if you do a crap job like me making corners in your top-stitching of the ends of the back pieces (and yes I could have picked it out and re-done it, but nope I didn't). Hopefully I made up for it with lovely hand-worked buttonholes in vintage silk buttonhole twist. And two pretty vintage buttons.


I sewed the size Small, for 34" bust and the fit was spot-on. Now, I was seriously concerned about the ability of this top to hold up my D-cup girls without sagging, and without me having to cinch the halter so tight it cut the circulation off to my head. But look ma, no sagging! I think if I use a mid-weight cotton next time instead of lightweight, I probably won't need to interface the cups, but I'd only opt not to if I also used a mid-weight cotton for the inside. You definitely don't want to go too lightweight with this unless you stabilize it.


(Sorry about a few wrinkles here and there on the beach top, especially the trim. I've already worn this a lot and forgot to press it after taking it out of the suitcase from a road trip. Whoops!)

Here's a look at the back. Note that the strap rides pretty low. At first when I tried it on I freaked myself out thinking it was way too small, because I pinned it across the center of my back!


Now this bolero, how the heck does that fit into the picture?


Here's the crazy thing: I sewed this bolero about 3 years ago from a 1950s pattern, when I was very first dabbling in sewing again. I knew absolutely squat, hacked away at the sides when it was too big, but was still pretty pleased with the final bolero. I sewed this up from a printed vintage feedsack... but never thought about what I could wear it with.

Which was literally nothing. NOTHING.

For years, this sat in my closet untouched and unloved. Even though it's the most crushingly amazing print!


I even forgot about it for awhile, until I saw the lovely Lauren from Wearing History sew a playsuit in the exact same feedsack print a couple of years ago. What are the odds? But then I sadly forgot about it once again. Poor, sad, unloved bolero.

Until I was trying on my new accidental polka dot playsuit, and it hit me like a ton of bricks. I was talking to Mel and suddenly shouted something like "OMG I can't believe what I just thought of!" and went flying out of the room, with Mel left wondering what made me lose my mind.

It was this. Oh. YES.


And together? Just exactly what I needed to turn this playsuit into something more modest when I need it.


Overall, I'm thrilled that I was able to put together this playsuit from three separate sewing projects.


I would highly recommend this pattern if you can't tell. I've already hoarded fabric for three other versions, with either a matching skirt or shorts, and possibly a version with a longer bodice. I'm hooked!

And hey, if you like it too, check back soon for a little something fun coming your way!


outfit details:

1950s bolero, beach top and 1940s dirndl skirt - made by me
vintage earrings & bangles - misc.
necklace - Luxulite
shoes - Feibinger


Friday, July 12, 2013

Halter style inspirations for summer

It's sure looking like summer out there!

Fortunately here we're not having the extreme heat wave some other areas are. (Don't worry, we got it last summer—just remembering the days on end of 100+ temps makes me want to jump in a bucket of ice.) But we have entered the part of summer when I dream of adorable summery outfits but then tend to wear shorts and a yawn-inducing tank top much of the time when I'm around the house. And for someone who mostly works from home, that's a lot of time. So I've been trying to come up with cuter styles to beat the heat and keep myself out of a summer rut this year!

High on my list right now for warmer months? Halters. I've been obsessing over vintage halter styles, let me tell you! Halter tops to wear with breezy dirndl or circle skirts, halter dresses like Hawaiian sarongs or sun dresses... you name it, my head has been swimming with them for weeks now.

Halters are great to help keep cool if you're willing to bare some upper body, and if not (or on cooler evenings), they're still wonderful with a cardigan or bolero. So I thought I'd share some inspiration for halter styles this summer!


{Sources clockwise from top left: sold listing from traven7, via Pinterest; Etsy listing from HelaQ; tiki 50s style bustier top from Boo Boo Kitty Couture; Simplicity 3250, my own copy;  50s inspired full circle halter from Outer Limitz; 1940s limited edition Shaheen print halter dress from Nudeedudee}


First up is a great checked vintage dress. Fun layout of a big print, amazing and kind of unusual halter neck, interesting color combination... I love it!

{Source: sold listing from traven7, via Pinterest}

Of course, playsuits and sunsuits often have halter necks, like this 1940s striped one. I love the touch of the ruffle on the bottom of the bra top and the buttoned sides of the shorts!

{Source: 1stdibs sold listing from Timeless Vixen, via Pinterest}

 And how about this Hawaiian-themed suit? I realize I'm here to talk about halters but omg, that print. I'll say it again. THAT PRINT!

{source: Reserved Etsy listing from Harem of Peacocks}

In addition to real garments, I often look to sewing patterns for inspiration. They're great not just to sew but to dream up ideas. However if you're looking to buy one, older patterns featuring halters tend to be much more rare than their non-halter counterparts, so it takes some digging to unearth ones that aren't extremely expensive.

The first I'll show you is Simplicity 3879, a 1950s pattern available on Etsy for $16. This is a bust 36, but I find 40s and 50s Simplicity patterns run really big in the bust (and keep in mind, this is coming from a busty gal), so I think this would work for a 38" bust without grading. How cute with a vertical striped skirt as shown, or sewn up into a little playsuit. There's even a bolero!

{source: Etsy listing from serine23}

Advance 6689 is $30 on Etsy, but look at all the options (some halter, some not). Holy cow! I love view 4 with the diagonal buttons and sweetheart neckline.
{source: Etsy listing from Epic Vintage}

If you're looking to sew for your daughter, or in the mood to grade up from a 26" bust, feast your eyes on this adorable pattern, McCall 1528 from 1950, available on Etsy. I want an adult-sized sunsuit like this, complete with embroidered touches. I'll take the non-halter style, too. Yes, please!

{source: Etsy listing from Historically Patterns}

I love this Advance pattern below (bust 32"), currently up for bidding on eBay. Can you just imagine this wrap-front set in a great tropical or novelty print?

{source: eBay listing}

I have a pattern with a similar top, Simplicity 3250 below, that I was lucky enough to snap up in an eBay auction recently for $5.99. The same pattern is on Etsy from three sellers, all over $40! If you see a pattern for more money than you're willing to pay on one site, it can't hurt to plug in the name and number into another site. You might come up a winner like I did!

Of course, I don't have a lot of reasons to wear a top like this without altering it to give it some midriff coverage. But could anyone blame me for working from home in a cute set like this? Hmm.


Simplicity 2026 below is from 1947 and is available on Etsy for $35. It's a size small, for bust 30-32, but there's not much to these tops (see that as a positive or negative, heh), so it might be an easy to grade up. Personally, I'm going gaga over the inset style in View 2, with the straps coming from the very center of the top.

{source: Etsy listing from HelaQ}

That style of top is the one I'm most in love with, with the straps coming from the center front, and sometimes a gathered bust. You occasionally see that feature on swimwear, sarongs (like this one from Vintage Blue Moon) and dresses (like this one from Dear Golden). I've always adored that shape! I've been dreaming of tops in this style (not just a bra top, but you know, some actual coverage), but I don't have a pattern for anything similar, so I'm still pining away and dreaming.

Now, what if you don't want to sew but you want to buy something? There are a some great options available!

I think my favorite has to be these limited edition 1940s style halter dresses by Nudeedudee. They're made using reissued Alfred Shaheen print fabric, what could be better? Kim only has a few of these left, and in the medium and large sizes, so now's the time to snap one up. I can tell you firsthand, Kim's work is amazing!

{source: 1940s limited edition Shaheen print halter dress from Nudeedudee}

Check out this halter dress by Outer Limitz. This one is a size medium (38" bust, 30" waist), but Diana has lots of great items in her shop! I love this print and the unique neckline. Isn't it so fun?

{source: 50s inspired full circle halter from Outer Limitz}

How about tops? Boo Boo Kitty Couture has some killer cropped halter tops, like the below top featuring tiki print fabric and pom poms (seriously, the pom poms make me so happy I can't even tell you). Pop on a solid skirt or a pair of capris and you're good. There's also basic black to go with all your great prints. Aislinn also has lots of other great repro offerings in her shop!

{source: tiki 50s style bustier top from Boo Boo Kitty Couture}

Now here's something I already own. I recently become enamored with the cropped Trashy Diva Trixie top. Okay yes, these are not strictly halter tops off the shelf, but the straps fasten with buttons at the back, so they can be unbuttoned and tied around your neck as a halter if you'd like. I'll talk about it more in an upcoming outfit post, but I can offer a word of advice: the sides are elastic and quite stretchy, so you may want to size down.


I suppose at this point, you must suspect I'm sewing up a little something in the halter department with all my daydreaming! And you'd be right. While I haven't bit the bullet on any vintage halter dress patterns yet and I'm still searching for the perfect 40s one with a gathered bust, I am working on a project and if all goes well, I'll share it soon once it's complete.

Stay tuned for more halter summer goodness from me!


Monday, July 1, 2013

Crazy for tulips skirt and blouse

I assume by now everyone who was using Google Reader has exported their feeds to another service like Bloglovin or Feedly? Today's your deadline if not, so you better hop to it! I exported my feeds to both of those services when I first heard about it, so I could play with them both. I decided awhile back that I preferred Feedly, partially because it included options to organize blogs into categories. I know you can do this with Bloglovin now too, so I might give it a try again. Options are nice!

Anyway, today's outfit is one of my favorites so far! And it was an accidental side effect of clearly having tulips on the brain.


You may recognize the skirt from the sneak peeks in my shaped and lined patch pockets tutorial last week! This is the skirt that my little tulip-shaped pockets made it onto. It's another version of vintage Simplicity 4496, the same pattern I used for my polka dot dirndl skirt.


But you'll see that the tulip shape of the pockets aren't the only tulips on the skirt!


I used a free transfer pattern from Needlecrafter for a Pennsylvania Dutch tulip and rose design, flipped it upside down to follow the curve of the shaped edge of the pocket, and omitted the roses. I love how it came out and I'm definitely in the mood for more embroidery!

My fashion fabric was a buttery soft, somewhat lightweight cotton blend twill from Denver Fabrics called fine line twill. Let me tell you, I love this stuff! I had a mixup where I thought it had a slight stretch content and couldn't figure out why it wasn't stretchy, then I thought it was 100% cotton, and then when I checked the site I saw it's an 80/20 cotton/poly blend. At $5.25 a yard, I highly recommend it. I think it would be great for trousers or capris!


But wait, the reason I was telling you about the fabric was the embroidery. I decided I didn't really need a stabilizer on the back of the fabric since it was a firm weave, but I did run into an issue on the front: I have a transfer pencil, but the pencil is red and it just wouldn't show up on the copper-colored fabric. So instead, I used Casey's great tutorial for embroidering on a knit sweater, and it worked a treat!

I drew my transfer onto tissue paper, drawing the upper curve of my pocket just to match things up neatly, and hand basted it onto the top of my fabric. For those wondering from my pocket tutorial, I actually did the embroidery on the pocket piece after attaching the facing (that's why you don't see a seam allowance above the curve in the photo below), although that makes no sense and I'm not even sure why I did that. So don't be silly. Just embroider first, then attach your facing. Your facing and lining will hide the back of your embroidery.


Embroidering like this was a breeze! Since I was doing two pockets, I actually stitched an area on both pockets before moving onto another area, to make sure my stitches were going in the same direction, etc. I used a combo of stem stitch, split stitch and French knots.


The embroidery kind of perforates the tissue as you go.


And then you just carefully peel off the tissue at the end and pick out the extra bits with tweezers!


I just love the results. It really turns a plain skirt into something more special!


And apparently I've been into tulips lately.

Over a month before our trip to the UK, I sewed up this blouse, and if you follow me on Instagram you saw me wearing it several times during our trip.


The fabric started life as a vintage feedsack, printed with delightful tulips.


In this next photo I see the facing is poking up on the right... I swear even after under-stitching (and sometimes after carefully tacking it down across the bodice front/back, not just the shoulders) this still happens to me. I loathe facings.


What I don't loathe? This blouse! This jubilant tulip print with red, gray and two shades of blue is one of my absolute favorites, I think, but it's just so hard to pick a favorite with feedsack. I want them all. Seriously.


Sorry I'm not sharing anything more about the pattern I used... yet! I'll just give you a little hint: it's not a vintage pattern, but a modern one that I modified. You'll hear more about it in the future, I promise!


After this skirt though, I think I'm temporarily over waistbands. I know you know that feeling, when you're working on a project and when it's done, you think, "Well that's about enough of that for the moment!"


So I think I may focus on some solid-colored blouses (perhaps with embroidery) to go with the amazing novelty print vintage skirts I never wear because I don't have tops to match. Now of course I have tops, but not ones I want to wear with them... you know how that goes. And I'm looking longingly at these wardrobe orphans and want to do something about it. Enough it enough!

Do you have a favorite vintage or 40s- or 50s-inspired blouse pattern you love?

Thursday, June 27, 2013

How to make shaped & lined patch pockets (with a few tailored touches!)

When I was working on my Sew for Victory jacket, I was quite tickled with how my lined patch pockets turned out, and I've used more-or-less the same technique ever since. It's based on tailoring methods for patch pockets. I can't claim credit for inventing these steps by any means, but like anything, I tweaked the process until I had a series of steps I really liked, so I wanted to share how I do it!

I love this method for so many reasons! There's no hint of lining poking out at the side of the pockets, it has a nice professional-looking finish on the inside, and the curves just come out nicer than some other methods I've tried that involve lining. Winner in my book!


Patch pockets are awesome. Cute, casual, fun on retro dresses, skirts and aprons, and super practical. You can make them in contrasting fabric, adorn them with embroidery, rick rack or more. They can be classy or kitschy, whatever your little heart desires! When I'm home it's often where I keep my cell phone and sometimes a measuring tape or keys, and when I'm wearing something without them, I curse and wish I had them.

The tutorial I'm sharing today results in a really nicely-finished pocket with a few little touches pulled in from tailoring. It has a self-fabric facing at the top part of the pocket inside, so you peek in and see the same fabric (especially handy if you're adding them to a gathered skirt, as they stick out open a bit!), and then lining fabric to cut down bulk for the rest of the pocket. It's all created in a way that makes sure the lining doesn't peek out on the right side. Finally, while you can topstich the pocket in place, I'm going to show you how to invisibly slip stitch it onto your garment. So let's get to it!


  • paper and pencil for tracing
  • fashion fabric for pocket and facing
  • lining fabric (rayon bemberg, poly lining, or lightweight cotton like voile or batiste all would be good choices... but if you're going with contrasting for fun, why not try a cute cotton print?)
  • interfacing of your choice


First off, you can either use pocket pattern pieces from your pattern of choice or create one yourself!

Inspired by a few 1940s and 50s patterns (most recently this New Look sundress pattern), I went with tulip-shaped pockets and drafted the shape freehand, tracing it onto tissue paper. I used the children's method of drawing a heart: I folded the piece of paper in half so each side was the same.

If you create your own pattern, just keep in mind your seam allowance so you don't accidentally make it too small. I used 1/4" as my seam allowance. And for reference, the width of my pocket piece was about 8" and the height about 8 1/2".


Once you have your pattern piece cut out, create a piece for your facing, which will be at the top of the inside of your pocket. I just created it by tracing from my pocket piece.

The facing can be as deep as you'd like, but at least 1 - 2" or so (not including seam allowances) is a good starting point. If your pocket is shaped with a big curve or two like mine, make sure that length extends below the lowest point of the curve like I did.

Don't forget to add your seam allowance at the bottom. This is where you'll sew the facing to the lining.


Time for your lining piece. The lining piece will be the size of your pocket less the size of the facing piece, plus a seam allowance. Make sense? Both the facing and the lining have a seam allowance since you sew them to each other.


But wait, here's the most important part!

You can do this when you cut your facing and lining piece or after, but don't forget: trim about 1/16" off the outer edges of your lining and facing pieces. They should be just slightly smaller than your main pocket piece. This means you'll have to slightly stretch your facing and your lining pieces when sewing to the main pocket piece, but it's the secret to the no-show lining and clean finish on the edges of your pocket. I promise!


Now you can cut out your pieces. Cut your facing and main pocket pieces from your fashion fabric, and cut your lining piece from your lining fabric. A tip I learned from Liz and have since seen Sarai from Colette Patterns recommend when using silk: if you choose a slippery lining fabric like I did, use a fabric stabilizing spray to tame that bad boy. Trust me (and them), it's genius. Genius!

Almost assembly time. First though, I added about 1" of fusible weft interfacing to the upper edges of my facing piece to help the pocket not stretch out over time. I caught it in the seam allowance, but if you have heavier fabric and are using fusible, you may want to trim it clear of that.


Now, assembly! With right sides together, pin your facing to your pocket piece like I did already above. You should only have to stretch the facing ever so slightly when pinning it together. Using whatever seam allowance you established (1/4" for me), sew only the shaped top edges together, not the sides. Press, trim and grade your seams, clipping inside corners closely but without clipping into your stitch line. (I totally didn't grade my seams.)

(Sorry this is a blurry photo, it was the only one I got of this step.)


Pin the lining piece to the facing piece, right sides together. Leave at least 3" open at the very center. This center opening is how you'll turn the pocket right side out at the end.


Sew the seam on either side of the opening.


Trim and press the seam towards the lining, including over the opening. It'll make it easier to close it up at the end.

(Note: you'll see below I actually had pressed the curved top edge at this point, though it's not necessary to do it yet.)


Time to sew the lining/facing side to the pocket side, which will close up the pocket except for that opening. Right sides facing, pin it all together, carefully stretching the lining to get it to fit the pocket. I like to pin the sides of the facing first, then the center bottom of the pocket, and then go up each side, stretching carefully. It may take a bit of work, so lots of pins will help keep everything in place. When it doubt, hand baste after you pin!


It's almost impossible to photograph, but at the very upper edge where you sewed the pocket and the facing together along the curved edge, when you're pinning it, just slightly roll this seam towards the facing side. This will make certain that when your pocket is right side out, the seam isn't peeking out at the upper corners.


 It may help to see what this looks like once you've sewn it, to clarify:


After pinning, your pocket will curl up slightly off the table because the lining side is slightly smaller. Don't worry, this is exactly what you want to see!


Now, starting at the top edge of your pocket, sew down, around and back up to the other side.


Trim your pocket seam allowance, and clip around your curves, either snipping into or taking out little triangles... I snipped this time. Press the lining seam allowance towards the inside of the pocket lining (I don't bother trimming the lining seam allowance).


At the very top edge where the facing and pocket meet, clip that seam so that you can press the facing towards the inside of the pocket, too, and trim that seam close to the stitch line for a crisp point.


Through the hole that you left open earlier, turn the pocket right side out carefully. Yep, it'll look like a mess for a little bit.


With a finger or two inside the pocket opening, gently poke your curves into position. Because of all your careful prep work, this should actually be pretty easy, unlike other methods where I've sometimes been cursing up a storm at this point because my "gentle curve" is more like 6 or 7 little flat lines. That's in part because your lining is a little smaller, so those seam edges won't show on the front at all, so everything just naturally rounds itself out in a much more civilized fashion. No cursing necessary.

See how the seam favors the back and not the front of the pocket at the top edge? That's because you rolled that edge towards the facing side when pinning. Use a point presser (knitting needles work too) to coax your points into position at the top of the shaped edges.


Gently press your pocket to set everything into position. You'll notice when you do this that the pocket fabric rolls towards the lining side a bit just like I said it would. No peekaboo seams for you! Pretty nifty, especially if you're planning to use a contrasting lining fabric!


Oh, don't be an idiot like me: once you're done admiring your work, close up that hole you left on the inside right now, or you'll be trying to jam Steam-a-Seam Lite into it when it's pinned and already halfway sewn onto your garment...enough said.

Now you should have a nicely curved, professionally lined and faced patch pocket!


(This is the point where you might be saying, "But wait, that's embroidered and you're almost done with the tutorial and you haven't even mentioned it yet...!" You'll just have to wait until I show off the final garment to hear more about it!)

Pin your pockets to your garment. Feel free to use topstitching to attach it to your garment if you'd like, or invisibly attach it with slip stitching like I did. Here's how.

Starting at the upper corner, take your threaded needle through the inside edge of the pocket, so you can't see it from the front. This also buries your knot on the back of the pocket and not inside your garment, in case you're particular enough that it would matter to you... I do this by habit, not because I'm that particular. ;)


Take a tiny stitch through the garment fabric with your thread and needle. Continuing to keep your stitches juuuust on the inside of the pocket, tack in place a few times at the corner for stability.


Then carry along the edge of the pocket, taking small stitches through the inside edge of the pocket and the garment below it, all the way around. Really make sure the stitches are small so you've got the pocket nice and attached to your garment. Don't pull your thread too tight or the pocket will pucker. I like to take a few stitches, then very gently tug on my thread to snug things up. (I do the same thing when sewing together knitting, by the way.)


When you get to the other corner make sure to take a few stitches for security, and knot off. You're done, and now have a pretty professional looking, adorable pocket on your garment!


And when you take a peek inside the pocket, you'll see the self-facing and your lovely lining. Nifty, huh?


Hope you've enjoyed this tutorial. It's one of many ways to create patch pockets, but it's a nice method to have in your sewing arsenal, I think!


Interested in seeing more of the garment my pockets made it onto? I'll be sharing it soon! :)


Related Posts Plugin for WordPress, Blogger...