
Boy, am I glad I decided to do a muslin! In yesterday's post I was all excited to try and turn Anne Adams 4855 into a blouse. Not working out well, so far.
I re-drafted my pieces, cut out my muslin and started in on the sewing. Putting together the sleeve was a bit awkward, as you sew the shoulder seam first, then turn back the seam allowance on the front and back bodice pieces, then topstitch over the sleeve.

Then you sew the side seam. In my case since this wasn't going to be a dress, I just sewed the seam completely down the side instead of leaving part open for a fastener. Easy. But when I tried it on, it was a big fail.
First, I think this was meant for someone with much broader shoulders, so I could easily trim the width at the shoulder by an inch or two. But more importantly, the sleeve is just all kinds of funky. I have no clue how the sleeve in the drawing can be so crisp and perky, because that is quite the opposite of what I got. It was floppy and acted weird under my arm and bunched in all the wrong places (as if there's a right place to bunch). I started to think it was the muslin, which is pretty thin, and realized this type of a sleeve was probably better suited for a stiffer fabric, so I had a feeling I was going to end up abandoning this pattern for this particular fabric. But I wanted to take a closer look, anyway.
I laid the bodice down on the table and started comparing it to the pictures in the pattern. I noticed something weird going on.
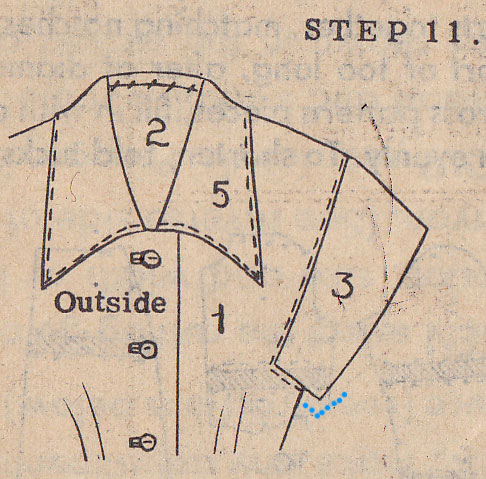
Here's the curve of the sleeve. Notice how the short sleeve comes out from the side seam and then makes a right angle. Follow the little blue dots.
Now look at my sleeve. (Don't mind my slapdash topstitching... it's a muslin, after all.)

Which matches how it shows you sew the sleeve in a different diagram.

No right angle. Even though the sleeve looks perfectly innocent, like it might actually replicate the nice sleeve in the drawing, it does not.
I confirmed that I didn't do anything wrong in my sewing. So unless I am completely crazy, that right angle is not happening. It's just not how the pieces are shaped. And what that means is that in order to actually hem the edge of the sleeve, I'd have to do some serious trickery, because that angle does not allow you to evenly turn back a hem. I even opened up the side seam where it meets the edge of the sleeve, pinned it all back to take a look at it on me, and it didn't help much. Not to mention the fact that with my hand on my hip, I could indeed easily see straight through the sleeve to my bra. I can't really see a reason to alter the armhole to make it less deep so that doesn't happen, as the sleeve still looks crappy for other reasons that the depth of the armhole wouldn't fix.
I'm sure there's a way to turn this around, but I'm not sure what that way is. Right now I'm annoyed and no closer to a nice white blouse.
I think I'll go knit!
Argh! I see what you mean about it... the pattern piece is shaped totally differently from how it's shown in the diagram.
ReplyDeleteI hope your next attempt is more fruitful!
Hmmm... Crazy thought, but is the sleeve upsideown?
ReplyDeleteOkay, it's probably not but craziness is happening. So sorry. I always resort to knitting when my sewing gets too tough.
I'm looking the first picture, the vintage sewing diagram, and it seems like along the sleeve allowance (at the top, above the #1) on the body there seems to be a notch where the body of the blouse is making a right angle.
Here...I posted it on my flickr http://www.flickr.com/photos/zilredloh/5515578775/
Where I circled in red, is this happening on your blouse-body portion? I have a hunch the you should only be sewing to that point for the actual sleeve.
And my aqua colored line would theoretically be your sewing line. Does this make sense??
Again, I'm no expert, but this is my hunch. That way you have all that extra fabric at the right angle to make your sleeve cuff.
Also, have you thought about adding some interfacing just to the sleeve edge so you can get this nice, crip sleeve? If you did, you could use your nice cotton fabric for the shell, but get the stiffness you want in the sleeve cuff and the perhaps the collar as well. (Just a thought)
@zilredloh Not a crazy thought, but sadly not upside down, either. LOL
ReplyDeleteI know exactly what you mean by your diagram! But actually, that part is the part of the sleeve that makes the L shape along my line of topstitching. I should have posted the example from the pattern of the stitching line, I went back and added it into my post. You really do go right along the sleeve down to the body, resulting of course in a smooth line like I have, not what they pictures. So odd.
If I can figure it out (this is of course if I don't just chuck it all into the closet), I may do that with the sleeve, thanks for the suggestion. The sleeve is such a small piece, I could possibly underline it or maybe even try some fusible interfacing. I could try it on the muslin since it's a similar weight to my fashion fabric.
I don't know how to sew (yet!), so I don't have any suggestions. I do sympathize, though. I spent forever on a couple of sweaters last year and I think I've finally decided to just frog them. :-( I hope it works out and we'll get to see a pretty finished object. Have a great evening!
ReplyDeleteHow frustrating: the illustration is so cute too!
ReplyDeleteI know it feels like a failure as a seamstress, but maybe it's just a poorly drafted pattern. Let's blame Anne Adams instead ;)
I have a peasant top with big open sleeves like this and it has an underarm version of a modesty panel in there. If you do decide to try to make this work, that could be an easy thing to add to keep the sleeves from becoming a peep show.
@Lauren Hairston Thanks Lauren! It's so frustrating when projects don't work out the way you want them to. You should frog your sweaters and reclaim the yarn and turn them into something new. :)
ReplyDelete@Moxie Tonic I know, it does look cute doesn't it? But I guess the longer I look at the pictures the more I realize the sleeve and armpit really couldn't turn out quite like the picture. It seems like a case when it works nicely in 2D but not 3D. So I guess I'm not surprised I'm having troubles. I will definitely consider the modesty panel idea if I do manage to make it work!
Gosh how blumming frustrating! It's stupidly early in the morning here as a I can't sleep so I can't even think of a suggestion for you sorry!
ReplyDeleteIt could be the pattern is wrong, I have worked on old patterns that I've had to make alterations on as they've been way out!
That is so odd! I wonder if it's just a misleading illustration? Because your muslin looks like the actual sewing instructions. How frustrating! Do you think there's any way to alter the pattern piece so that it does work like the illustration? However, that won't solve the breezeway to the bra problem. What a massive bummer. I hope the knitting intermission helps. It is awfully cute so I hope you find a way to make it work.
ReplyDeleteOn that top diagram, it looks to me like you stop stitching the seam just before you reach the curve, turn the garment right way out, and lay the bodice piece over the sleeve with the edges already turned under and topstitch it down as a right-angle rather than "seaming" it. Your sleeve will have dropped down into the underarm and there will be a tuck of fabric making a hinge? Only after doing that would you sew the actual side seam. I think. Maybe.
ReplyDeleteAnd yes I would use stiffer fabric.
(Or a different pattern!)
Bummer! I've never attempted this sort of sleeve, so I don't have anything to offer except my sympathies.
ReplyDelete@Straight Talking Mama! Yep, sadly I'm thinking this Anne Adams beauty is out to lunch in the sleeve department!
ReplyDelete@Moe I think it's a misleading illustration. I really don't think there's any way I could have sewed it to get that result, even if I open up the entire seam the sleeve just isn't shaped that way, ya know? In the end it probably don't really matter if it does or doesn't make that right angle, since the fit is crappy. When I can be a bit more objective I'm going to give it another shot. Btw I totally love the term "breezeway to the bra"! :D
@Roobeedoo You're right, it does show that, but as it turns out it's just because it's where you stop sewing to insert the side zipper since the pattern is for a dress. At some point though I'm going to try and figure out a way to make it all work!
Hi Tasha, so sorry to hear that your enthusiasm turned into a mess. Unfortunately sometimes those illustrations aren't exactly identical to the pattern, but artistic freedom is being used in the making. Now, if you want sharp sleeve like on the second picture, you have to turn that sleeve curve under arm much more tighter than what it is. If not even a sharp corner instead of curve.
ReplyDeleteAlso when making hemming on the sleeve you have to cut the seamallowance edge wider than the actual edge of sleeve or trouserleg, otherwise hemming is too tight and is pulling the fabric. Seam allowance is mirror image of the pattern when folded back along the edge of the sleeve. Does this help at all?
@Rhia Thanks, this was very informative about the sleeve. If I do go back to this and struggle through to make it work, I will definitely remember this! I haven't done enough sewing to have kept that factoid about the seam allowance on the sleeve in the back of my head, but makes perfect sense.
ReplyDeleteHi, I've never commented before, but I had to pass along this info- I seem to remember having a vintage dress (1920's? 1930's?) where the sleeve fabric just ended under the arm- (although hemmed, of course) It was shaped kind of like the headdress The Flying Nun used to wear, (ooops, I'm dating myself...) or a kimono sleeve. I guess the only way I can describe it is that the sleeve looked like an upside down U, with no underarm connection. So, I know that this may sound strange, but is it possible that the bottom of the sleeve just isn't supposed to be sew together, only hemmed to itself to make a kind of modified flap or panel (for lack of a better word)?
ReplyDeleteGeeze, I hope this helps somehow...
Hi! Sorry that's not turning out the way you want. I have a couple of mail order patterns from around then that actually had a little section you cut off or tucked under if you were going to make a different sort of sleeve. Maybe there is a little triangle of pattern missing on your copy as a result? I have no idea if Anne Adams patterns in particular did this though...
ReplyDeleteI feel your pain, I currently have a 60s child's dress scrunched up by my sewing machine until it agrees to behave :(
Good luck!
Thank you it's really beautiful
ReplyDelete