Showing posts with label lining. Show all posts

Sunday, March 24, 2013

40s jacket progress: the last steps

While you're not seeing it today, my Sew for Victory jacket is now complete!

I'm super anxious to share it with you, but I'm staying on track so I can just share the remaining construction bits. I'm also being sneaky and going to show only up close photos until the final reveal (soon!).

When I last left off, I showed you the lining. Once the lining was complete, the final remaining steps were to sew the band at the bottom, the cuffs, and to handwork the buttonholes. Not huge steps, but they did take awhile to execute well.

The bands at the bottom were pretty easy, but the prep was a little lengthy because both the front and the back of the bodice was gathered.

Before gathering, I pinned the lining and the jacket together at the bottom and then basted them together, then I ran two rows of machine basting to gather the fabric.

Keep in mind that the lining was 1" longer than the bottom edge of the jacket body, in order to for the slight overlap in fabric that you see a the bottom of tailored jacket hems (and inside sleeves, too), called a jump hem. This allows extra ease when you wear it. But for now, I ignored it and just lined up the raw edges of the lining and the jacket body.


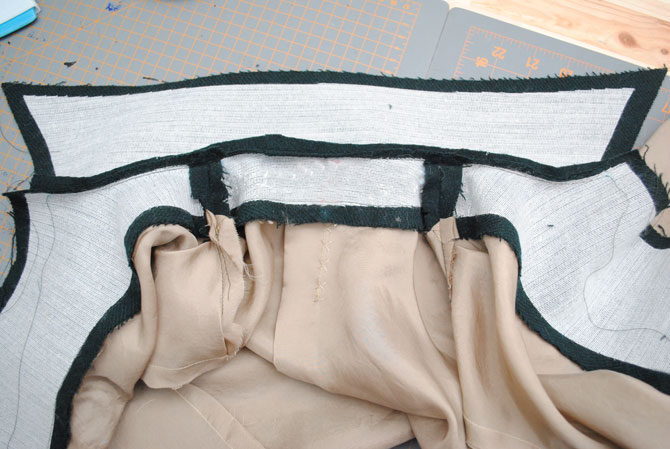
The bands were faced with the same fashion fabric, and I interfaced it all with fusible weft interfacing. You can see what it looked like before I folded it:


I pinned the band to the jacket right sides together, easing in the gathering (veeery carefully, since this was hard to do with thick fabric!), then basted it all together by hand... story of this project.


I tend to do a really slapdash job of gathers, so I actually took the time to check the right sides to make sure it all looked okay before sewing it all together. Go me. You can see what it looked like from the right side once the seam was sewn, and before folding the facing to the inside and slip stitching in place. Kind of like the reverse of a skirt waistband!


Once the band was slip stitched, you can see how nice it looked. Of course still quite puffy since I hadn't tailor basted the edges and pressed yet. I did some mean invisible slip stitching on this project if I do say so myself!


After tailor basting and pressing, that's when it started to look more like this:


Now wait wait, did you notice there's no slight overlap at the bands like there is in the pattern picture, and like I did on my muslin? I basted it all together with no overlap at first because I totally forgot. I tried it on and liked the fit before it even occurred to me there was supposed to be an overlap. When I realized it, I decided to ditch the overlap because it would have meant less ease as the waist. I also wanted the option to wear the jacket open, and with the overlap I thought it would look weird. It was hard to line up those bulky seams perfectly with the jacket but it worked out.

The process for the sleeve cuffs was pretty much the same thing so I'm not going to go into every detail. But it's worth pointing out the difference was that the (also gathered) sleeves opened at a vent. In the photo below hopefully you can see that I made the lining vent 1" longer than the vent in the sleeve, to account for that final extra jump hem. You can see it's longer because you can see a peek of the white batiste underlining of the sleeve.


That's better illustrated by the photo below. Once the sleeve cuff was slip stitched shut on the inside, you can see how I had to then slip stitch the opening of the sleeve and lining vents together or else they'd be hanging out in the open.


Okay, now if you're confused at all about the jump hem and the lining being a little longer, this photo below should help clear things up. I folded the sleeve vent down into position, so that the bottom 1" is folded into a little 1/2" pleat. Then you can see how the rest of the lining billows slightly down. That's the extra bit for ease, so it's a little bit bigger on the inside. In fact, think of the jacket lining a bit like the TARDIS.


And here's what it looked like one I slip stitched the vents shut. You can also see when I initially tailor basted and pressed the sleeves that I rolled the vent seam slightly to the inside so it wouldn't show.


Since the last little 3" of the where the body lining and facing join the bands needed to be slip stitched shut too, you can see that below:


At this point I could have pressed a little pleat with the extra lining ease in both the body and the cuffs, but I didn't bother... quite frankly I just didn't feel it was necessary. Especially with gathers in the body, I figured the pleat would be moving around and look weirder than just leaving it as-is!

What was left at this point? The buttonholes! The terrifying point where after all this work, I could have monkeyed things up but good. Fortunately, I didn't. ;)

Completely ignoring the center front on the pattern like I always do, I did some planning and carefully measured for my buttonholes. (And almost pressed too hard with my chalk, oops.)


I worked them by hand, mostly following Sunni's tutorial on how to handwork buttonholes. I used vintage buttonhole twist because it was the closest I could come to matching my dark fabric. It's also a little thinner than the Japanese buttonhole twist Sunni used (I know because that's what I originally ordered that was too bright green). I liked the weight better of the vintage twist. That's problematic though because it seems like there are very few (if any) options for thinner silk buttonhole twist, unless you want typical men's suiting colors like black or gray (even that's hard to get). That's a shame since I think it would be perfect for dresses and blouses!

In the end the buttonhole twist I used was lighter green than my fabric, but the same color as my vintage buttons, so it worked out quite nicely.

Oh in case you're curious about interfacing... I opted not to add any extra interfacing behind the buttonholes. My bodice pieces were underlined, and my facing pieces were interfaced with fusible weft, so those 4 layers really felt good enough to me when I worked up some test buttonholes mimicking all the layers.

First though, I sewed a small little window (using my all-purpose thread) around the buttonholes to slash through, in order to work them. Hopefully you can see it below in the middle:


Then I slashed them. Eek! Mildly scary!


And then I spent all of Friday night handworking the buttonholes. They aren't stunning, but I think they're pretty damn good.


The wool flannel was a difficult fabric to work them on because of the nap, so some of the stitches that are quite even don't look that way because the nap kind of pokes over. You can see that in the photo below, where the bottom looks better than the top, even though if you inspect it really carefully, the top is stitched just as evenly.


But I don't mind, I know I did a good job and I'm pretty proud of them. Actually I think I may now be mildly obsessed with handworked buttonholes! I definitely plan to do them on some future projects, too.

Aaaaaand that's the last you're going to see until I show you the final jacket! :)

Thursday, March 21, 2013

40s jacket progress: the lining (sewing & attaching)

Well everyone, my Sew for Victory jacket continues! I have never spent so long thinking about and working on a sewing project, so I'm sorry my non-jacket posts are few and far between right now. ;)

I am so close to being finished I can taste it! But today I'm going to catch up where I last left off. The last post was about sewing the shell, and today's post is about the lining.

This is a really long post, you've been warned!

My lining fabric is rayon bemberg which is slippery beyond belief. Seriously, when I explained to Mel what it was like to sew with, I did a crazy wiggle dance to visually explain. Liz was kind enough to let me borrow a fabric stabilizer to try out, which I very lightly sprayed near the raw edges of my lining. It really does help tame it a bit, as it makes it rather paper-like. (I saw Sarai mentioned it in the new Laurel companion; in fact the one pictured is the same one I borrowed from Liz.) I'd highly recommend trying it!

For the lining, I think I mentioned in one of my previous posts that I was converting my pattern to a combination method of hand and machine sewing. That's instead of sewing in the lining entirely by hand as recommended in my pattern, so I'm taking a cue from (some) modern tailoring techniques (and at least one original Ike jacket, as confirmed with reader Nadine!). To do the method I picked, you sew as follows:
  1. shell: fronts and back pieces, under collar, sleeves (all in your fashion fabric)
  2. lining/facing: front and back facings, front and back linings, sleeve linings, upper collar  (the facings and upper collar are in the fashion fabric)
And then once both units (shell unit and lining/facing unit) are complete, you sew them together along the outside edges and up along the collar.

What I don't think I mentioned is that I used separate pattern pieces that I created specifically for the lining. This is recommended in Jackets for Real People and a number of other places, including this tutorial from Jen at Grainline Studios. I won't go into what I did—if you want to know, just read Jen's post. That's essentially what I did to tweak my lining pieces.

I decided to interface my facing pieces with fusible weft interfacing. To sew my front facings to my front lining pieces, I pinned first:


And then I hand basted and removed the pins. Basically I hand basted every single seam in this project! See my crazy basting stitches as the end, below? I do that to really anchor the ends to keep them from moving if the fabric is slippery, or if it's a curve or some other angular junction where the fabric may try and get shifty on me. (The nerve.)


(By the way, you can see how I cut the interfacing without the seam allowances. I would not do this next time. This caused me issues later on. I learned my lesson and when I interfaced my bands and cuffs I went all the way to the edge.)

Front facings are sewn together are below. See how there's a pleat at the top? I used pleats (basted them by hand, then machine) instead of darts on the fronts and back. I've read on numerous occasions they offer a little more ease that way, and I was happy to avoid sewing darts in my lining, let me tell you. I forgot to show here that I left about the bottom 3" unsewn between the lining and facing so I can hand-stitch it shut later when I work on the little jump hem at the bottom. (More on that in the next post.)


Before sewing the back neck facing to the back, there was a little work to be done. In a tailored jacket, the back lining piece has 2" of extra fabric at center back folded into a 1" pleat for wearing ease, and it's tacked down at the top and bottom for a couple of inches (and if it's a longer jacket or shaped at the waist, I think usually at the waist, too). Usually these days that's done by machine.

My pattern suggested a bar tack, but I ended up doing a two things. I sewed about 3" shut at the top and bottom by machine, then pressed my pleat into place:


And stay stitched across the neckline. Then I cross stitched for a bit of embellishment, using silk buttonhole twist. Nice touch, isn't it? This is a vintage detail I picked up from that digital copy of the 1946 tailoring book I told you about!


Now, I opted to do a back neck facing, which isn't strictly necessary, but I thought it would be nice. It looks innocuous enough below but boy, sewing that curve is a pain. Lots of clipping and basting was involved. (By the way the little bubbles you see at the sides are the tiny pleats on the back.)


When the back lining is all put together, you can see how the center back lining pleat works and the location of my two sets of decorative cross stitching. The center of the pleat is not sewn shut.


With the facings attached to their respective lining pieces, I sewed it all together. Same routine of pinning first, then hand basting.


I actually had to rip out the junction between the front and back facings at least twice to get everything lined up juuuuust so, but in the end it looks great!


(Note above I had forgotten to stay stitch the neckline on the front facings so I did that later.)

With the front and back done, I moved to the sleeves next. Remember the vent at the bottom of my sleeve, that will lead into my cuff? I had to do that in the lining too. And I basted the patch to the inside with silk thread until it gets sewn to the fashion fabric later on.

(Eek, the apex of my lining vent looks like rubbish.)


Then I set the sleeves in. I used two rows of ease stitching, pinned, then hand basted once again. It worked pretty nicely. I got a couple of tiny puckers in the sleeve cap but that was one area where I said, "Give me a break, once this goes into the body it will never be seen again."


Sewn all together, it makes this billowy, kind of funny looking mess!


Last step is attaching the upper collar, which I also interfaced with fusible weft. (It's here where I ended up truly cursing not including the seam allowances.)


(In seeing the above photo, I guess I forgot to trim my facing seam allowances. Oops.)

Before sewing it all together, I wanted to check to see if I needed to make any changes at the collar for turn of cloth. I first saw this tip on the Colette Anise sew-along, and followed Sarai's procedure. You pin the neckline with wrong sides together, then put it on a dress form (or have someone help you on your body). You would look at the back of the neck here, but I didn't get a good photo of the pinning process so I'm showing you this below so you can see where I placed my pins.


I looked at the back to see if the under collar poked out. If it did, you trim it... but mine didn't. So I left it as-is. (In the end I got a tiny bubble under the collar that I can't fix, so I should have been more careful in this step.)


Then you unpin it and sew the two units together. I'm sorry I really didn't get photos here because this was the point in the project that I knew would be kind of a nightmare, so I was really more focused on my sewing. :)

Looking at this blob below, it was hard to believe this was ever going to turn into a jacket.


Even while I was sewing I felt that way. Below is (I think) after I'd sewn the collar together. I sewed the collar, then up each side.


So that nightmare I mentioned was only a small portion of sewing the lining to the shell. Specifically it's my personal hell that is the pivot point between the collar and the lapel. This is where not-pointy-enough-chalk and not-interfacing-the-seam-allowances and should-not-have-used-slippery-silk-thread-to-baste-my-underlining along with having about 5 too many thumbs all came together in the perfect storm. I had to rip out several times, my fabric started raveling... it was terrible.

There were almost tears. There was definitely some shouting. And lots of swearing. And complaining on Instagram. And an email to my mom about how much I'd put into this project to have it all come down to, as I believe I put it (all caps, even), "TWO !#@#$^$ RIGHT ANGLE INTERSECTIONS".

And I show you this horrible photo only because I love you. This was midway through the madness.


But in the end, I stepped away for the day and came back and figured a way to make it all work, more or less to my satisfaction. And here's what it looked like once all the seams were trimmed.


So then it was time to turn it right side out (well, shell side out, lining in). To help pull the bulky collar corners out, I reached in with a double strand of thread in the point and used it to help me get it out. (Gently!)


And if you look at it at this point, it's both exciting but a little scary, since the seams are a puffy mess:


In tailoring, you baste the seams with silk thread before pressing. You slightly rolling the seam towards the inside so it doesn't show. Here's mid-baste.


However if your jacket or coat has lapels, you need to switch which side you roll the seam towards at the break point. If I'd have taped a roll line, it would be at that point, but I didn't, so I just tried it all on and decided where the first button would go, which is about where I placed the two pins below:


With even just the basting in, you can see how much of a difference it will make to control the seams, below. (And if you look carefully, you can see that the roll of the seam changes at the break point. And that I pulled my thread too tight in some areas.)


Then you press. And for my wool flannel with nap, this means crazy carefully. With some testing, I determined the best method for the seams was: lots of steam just above the fabric and over a thin cotton press cloth, then pressing just the edge of the seam with a clapper (AKA the bottom of my point presser). Let cool. And repeat once or twice as needed. This is a time consuming process but absolutely necessary to get the desired result! I actually did this with a cup of tea sitting next to me, it took that long.


But before I show you what it looks like, I'll show you the last step of this post. You have to sew the upper collar and under collar together. I've read to use a catch stitch but it was just too awkward to execute with all the lining in the way, so what I did was probably more like a slip stitch. Whatever, it's together and none of the stitches show. Here it is before sewing it shut, so you can see how it looks:


I should point out here I opted not to tack the lining to the shell anywhere. From everything I've read it seems there are a lot of ways you can do this... slip stitch the side seams together, do a French tack between the sleeve seam allowances to keep the sleeves from slipping, etc. Or you can just not do it at all. I tried the jacket on a bunch of times and just didn't feel it was really necessary, so I didn't do it.

And now at this point, the only sewing left is the band at the bottom, and the cuffs! Oh, and then hand working the buttonholes.

Look, it's a lining in an almost-jacket!


The pressing really seals the deal on those outside seams, doesn't it?


(In case you're wondering what you always see in the background, my dress form is between my sewing space and Mel's art space in the basement, so that's Mel's studio table in the background.)

I'm going to press it all at least one more time at the end (and adjust the break point if needed, once the buttons are on). This is the point where I got really excited though, when I saw how it was coming together!

I'll leave you with one final photo in this long post. I don't even know what this photo was supposed to show other than I've learned to be anal about color-coding my basting in this project... so let's just say it represents that in tailoring, basting is your friend! ;)


The next post (and the last one before the reveal) will be much shorter, as I wrap up just the cuffs, bands and buttonholes. And I'm thinking about doing a final post after the reveal on what I've learned to do (and not do).

Stay tuned for more as my 40s jacket project draws to a close just in the nick of time!

Related Posts Plugin for WordPress, Blogger...