Showing posts with label colorwork 101. Show all posts

Monday, February 20, 2012

VKC: Planning colors for vintage stranded knitting


Hi everyone! Has it been long enough since I've been able to do a Vintage Knitting College post?? Good grief! I was expecting to have so much more time to devote to this, but with the condo selling/house buying, obviously life has gotten in the way. Thank you all for your wonderful comments on my last post, I can't wait until we've moved and everything calms back down so I can get back to regular blogging! :)

So let's talk a bit about what can either be the really fun part or the completely aggravating part of planning a colorwork project: selecting yarn and colors. But honestly there is so much personal preference involved that I'm just going to touch on a few things for you to think about.


Figuring out the original colors in a vintage pattern

When you start a stranded knitting project, it's not as easy as "Do I want a red cardigan or a blue cardigan?" If you're working with a chart that's in black and white or a pattern with no chart at all (see my post on charts and vintage knitting), you'll have to start off by coloring in a chart. But with what colors?

Colors in vintage patterns are sometimes pretty obvious. Bottle green, maroon, light blue, navy, yellow... easy. Linden green or cowslip... even if you don't know what those colors look like, you can look them up. But what about ripple? Maybe a shade of blue, like ripples in the ocean? Who knows for sure.

If you don't know a color name from the original pattern, you're going to have to guess. Fill in the rest of the colors in your chart and use your best judgment on what the missing color could be.

Let's take the pattern I'm knitting, Bestway #82, Classic Fair Isle Jumper. (Incidentally, I added to the Ravelry database here awhile back.) I created a color chart from the pattern, but let's pretend I couldn't figure out the color fawn. I picked a dark brown to fill in those squares on that part of the chart.

Compared side-by-side to a more appropriate lighter brown, you can see how the dark brown recedes against the red. You wouldn't know for sure how it would look until you swatched of course, but it's a pretty good approximation for how the colors will contrast against each other.


Tips for picking colors for vintage stranded knitting:
  • Pick clear color combinations. You might have two shades of one color in a project (medium blue, navy blue), but don't pick too many shades of a single color or things will get muddy. You can look to resources on color theory if you'd like, but your eye will also tell you what works and doesn't.
  • Don't use multiple colors that are too similar in value. Kelly green, brick red, steel blue, gold, pumpkin orange... nothing will pop out in a palette like that. Kind of like the example above with the brown against the red. Make sure to incorporate some lighter and darker colors for contrast. Use a darker blue, or a pale yellow, a brighter red or a dark piney green. In any given row, you're looking for contrast between the two colors used. In many patterns from the 1940s, they used strong color contrasts which I personally really like. (You may not, and that's okay too!)
  • Chart your colors before you ever pick up your knitting needles. It's not a substitute for knitting a swatch, but a pre-cursor. It's a fast and easy way to play with colors and narrow down combinations before you ever buy any yarn. If you need ideas, peruse vintage catalogs for color palettes you like. The cover of vintage sewing patterns can be nice for this, too.
  • Feel overwhelmed? Chart the original colors, then change one color at a time. If it's too daunting to envision an entire new set of colors, just start small. Change pink to red, light blue to yellow. See if you like what you've changed. You'll be on a roll soon enough and before you know it, you'll have an entirely new chart and all you'll have to do is pick yarn.

    Tips for picking yarn for vintage stranded knitting:
    •  If you're trying for a more authentic vintage look, avoid heathered, kettle-dyed and variegated yarns. Look for solid colored yarn.
    • If you plan to steek your project, 100% wool is a must if you secure the steek by hand (hand-sewn or crochet). If you plan to secure your steek with a sewing machine, any yarn will work.
    • Lots of vintage stranded pullover patterns are short-sleeved. Stranded knitting is by nature thicker and warmer than regular knitting, so if you plan to keep the sleeves short and want to wear it in warmer months, consider using a cotton blend rather than 100% wool.

    Now, all that being said, don't feel like you have to be tied to replicating an authentic vintage look! Pick whatever yarn and color palette you'd like! While I generally try to pick colors and yarn that have a vintage feel, sometimes I just go where the wind takes me. I've used hand-dyed yarn for vintage patterns (I'm doing that with a separate vintage stranded project right now), and I've picked colors that might not have been that authentic to the era of the pattern. And there's nothing wrong with that.


    What yarn and colors did I pick for this project?

    When I first charted the pattern, this was my chart.


    The original pattern used yellow, powder blue, mauve, fawn and green for the colorwork and dull blue for the ribbing. My chart was based on the original colors used in the pattern except I replaced mauve with red. (I hate mauve.) I selected St-Denis Boreale, a wooly fingering weight yarn which I also used in my Bestway #B2637 stranded cardigan. It's a yarn I like a lot.

    Now, you saw me knitting with this color scheme in my post on tension in stranded knitting. But you know what? Back in early December, I decided the colors weren't really doing it for me. I think it's because I opted for a dark brown for the ribbing, and I just didn't like it the way I wanted to. So I cut the ribbing off to work it in another color, but by the time I went through all the trouble I just decided to scrap the whole thing and start over.

    After trying not to have a heart attack over kissing 10 inches of knitting good-bye, I played around with the chart and came up with this instead.


    I decided to bring the ribbing color into the colorwork section and reversed the light and dark sections in the top section. I swatched with a different yarn, liked what I saw and ran with that. Here are my swatches, which were both knit in the round on double-pointed needles, then cut. (If you do this, pay attention to gauge change. My gauge over a small diameter is always tighter than my gauge over a larger diameter.)


    (Side note: notice the darker red in part of the swatch on the left? I duplicate stitched over a red I thought was too pink. It's a good trick to employ if you're unhappy with one color in your swatch. You can see that the pinky red was too close in value to the light brown.)

    I'm now using Quince and Co. Finch, a tightly twisted fingering weight wool that I'm loving working with for the first time. One mistake I made was picking a lighter blue for the center stitches of the X O X pattern, so the green and the blue are too close in value. At the time I swatched I know I had some reason for not wanting to swap the lighter blue for the darker blue I can't remember why now, since it was 2 months ago. Ha ha!

    The other funny thing is since I've been so busy with the upcoming move, I also don't remember what motivated me to pick a pumpkiny orange, which is typically not a color I wear. I wonder why I didn't go with red? Oh well, sometimes it's good to push yourself outside of your comfort zone... maybe that's what I was trying for, or maybe I wanted to fill a wardrobe gap. Who knows, but I'm sticking with it now!


    What's next for colorwork?

    I'm sorry to say that the next Vintage Knitting College post likely won't happen until after our closings at the end of March and we've moved. I've barely had any time to do any actual knitting. Everything except about 2 inches of this sweater was knit weeks ago. :)

    So this is the perfect time to open up the comments for questions: what issues related to planning out vintage stranded knitting projects would YOU like me to talk about?

    Feel free to leave a question in the comments, and I'll either do a Q&A post if there's enough questions, or I'll incorporate your questions into my next couple of VKC posts!

    Friday, December 9, 2011

    VKC: Charts & vintage stranded knitting patterns


    Hi everyone! Let's talk about stranded knitting and charts.


    A bit about charts and stranded knitting

    Modern stranded knitting pattern use charts to convey the colorwork part of the pattern. Sometimes they'll use multiple colors in a colored chart, sometimes just shades of gray, or different shapes to represent different colors, or some combination thereof. Here are a couple of examples.

    {Source: charts from Ogiku beret and Olympic Reindeer hat}

    If there's anything particularly complicated in the chart, there is usually a key or legend.

    {Source: legend from Ogiku beret}

    The good news: Many vintage stranded/fair isle patterns have colorwork charted, too!

    The bad news: Some vintage stranded/fair isle patterns do not have colorwork charted. Boo, hiss.


    How do you knit with vintage stranded patterns with no chart?

    When there's no chart, you read every single row individually, following along with written explanations on when to change color. And it looks like this.


    Each capital letter represents a color. Say R is red, M is maroon. (Your pattern will indicate what letter represents each color.)  * k 2 R, 1 M, 1 R, repeat from *  would mean k2 in red, k1 in maroon, k1 in red, and repeat until the end of the row. You follow each individual row as you would for any pattern that's written out row-by-row, just making sure to change colors when it tells you to.

    Personally, I would never be able to knit this way. It's just too tedious for me. So I prefer to make my own chart for a pattern. You certainly don't have to! Even if you only use it to plan out your colors and you prefer to follow the pattern as written, it's a useful resource and a good exercise. (And I dare say kind of fun, but I'm a geek, what can I say.)


    How to chart out a stranded pattern with no original chart

    You can do it by hand with graph paper and colored pencils, or with spreadsheet software like Microsoft Excel (that's what I use), Google Docs (a bit clunky for this purpose), or OpenOffice (free). I prefer to use the computer because when you start off, you may find you need to move things around a lot to get them lined up right. Copying and pasting is easier than erasing and cursing.

    The goal is to chart one repeat of the pattern. Not every single stitch in the pattern, just what's repeated, i.e. the stuff between the asterisks or parentheses. So you may find that your chart ends up 16 stitches wide, or 8 stitches wide, or maybe 30 stitches wide.

    These are just some general steps. Of course every single pattern is different, so consider this a guideline. Your mileage may vary. :)


    Step 1. Setup a chart that's around 30 or 40 cells wide by about the same number of cells tall, and put a black border around those cells. This is an arbitrary size, you can add rows or columns as you go along. I just give myself a little more room than I think I'll need. I like to make the cells small. Knit stitches are slightly shorter than they are wide, so I usually do the same on the chart.

    Number the right-hand column of the chart. It helps you keep track of what row you just charted when you're flipping back and forth between the chart and the written pattern.


    Step 2. Begin with the first colored row for either the instructions for the back or the front (if it's a cardigan I select the back). Read past any ribbing instructions until you get to the part where the colorwork starts. Start on the right-hand most cell of the chart in Row 1, working right to left. Read the row in your pattern, and chart it out stitch by stitch. In this case, the row was just one color. An easy way to start.


    Step 3. Move to the next row. Keep in mind, odds are the pattern is written flat. You'll know because every other row will be purled rows in the pattern. If that's the case, you will need to chart Row 2 left to right. All right-side rows are charted right to left, and wrong-side rows are charted left to right. (In the end it won't matter if you knit it flat or in the round, as your chart still needs to look the same.)

    See how I highlighted the border on the first and last stitch in pink? You can see in this pattern, each row starts off with a stitch before the repeat (the part in the parentheses). In row 2, that's "P 1 R" below (purl one in red). So I highlight that as a reminder to myself, so I don't forget about it.


    Step 4. Repeat steps 3 and 4 until you've finished charting the colorwork. You'll know you've finished the chart because it will say something like "These X rows comprise the pattern". Eventually with some tweaking, you'll find you've charted one or two repeats of the pattern, like this.


    Step 5. The last step is to make sure you only have one repeat of the pattern charted. This makes it much easier to knit with the pattern, and easier to use the smallest number the pattern is divisible over if you'd like to change the size or gauge of the pattern.

    Eyeball the chart until you can see where it begins to repeat itself. Below, what is not grayed out is the repeat.


    So I'll cut out the other cells, and be left with the pattern repeat to knit with! Now I can print this, or look at it on my iPad.


    TIPS:

    If the pattern has shaping in it, keep that in mind in the beginning of the rows. You're not trying to chart every stitch in the entire sweater, just the repeat, so don't include increase stitches in the body.

    Pay attention if the pattern has you finish off a repeat of the chart with slightly less stitches. If you don't notice it you'll start to realize your chart isn't looking quite right because you're one or two stitches mis-aligned every other row. Look out for rows that end with "...until the last 7 stitches" or start with "...in the first 7 stitches". Sometimes this is done when there is shaping in a pattern, because then not every row has a full repeat at the sides. It may sound confusing now, but it will make more sense when you sit down with a pattern and try it out yourself.

    Aren't sure if what you have is a full repeat? Make a bigger chart, and copy and paste the repeat directly next to itself, so you have two side-by-side. You'll see if it lines up, or if it doesn't.

    You can tell the one below looks funky in the middle. Clearly the pattern doesn't line up, so I would need to play with it a bit more, or see if I accidentally skipped a column when I selected the stitches I thought formed the repeat.


    Compare it to the below chart, which is correct. This would confirm for me that I'd created the chart right and was well on my way to knitting.


    Don't get frustrated, and remember this isn't a precise science. Refer to the pattern picture frequently, and if you're not quite sure or want to change it slightly for some reason, use your creative freedom to tweak it a bit.

    When you like what you see, you're done!


      A few final thoughts on charted patterns

      Even though many vintage stranded patterns are charted, I still take the time to re-chart them if they have multiple colors. Partially because it's so much easier to work with a colored chart than trying to distinguish different colors in different rows represented by simply shades of gray or black and while.

      But I also do it because it's way easier to play around with color schemes when you can simply click a few buttons to fill little squares with whatever color you'd like to see.

      Bestway 82, the pattern I'm knitting, is actually charted. Consider the below a sample of what we'll talk about in my next VKC post... playing around with colors and yarn. Depending on your perspective and a bit of luck, that can be the most frustrating or the most fun part! ;)


      Have a great weekend!

      Wednesday, November 30, 2011

      VKC: Tension, puckers & even stranded knitting


      Today, let's talk about how to keep your stranded knitting nice and even looking! I'll cover a few things that tie together to make that happen, and give you my best advice for lovely looking stranded knitting.


      Tension

      You may or may not find that your tension changes from knitting with one color to knitting with two colors. Many people say your tension tightens up when you knit stranded (producing more stitches per inch than when you knit with one color), or that you get more relaxed as you go. You won't really know until you try it out for yourself.

      Using the same yarn, my gauge is pretty much consistent whether I'm knitting with one color or two. What's this all mean? That you will need to do a gauge swatch for a stranded knitting project. Period, end of story. It's okay though, because you'll want to do one anyway to make sure you like how your colors play together. (We'll cover that in another post soon!)


      Floats and puckers

      When you work in stranded knitting, only one color is being used in a stitch at a time, obviously. So the other color waits for you at the back of the work, to get knit with the next time it's needed. That strand of yarn between the stitches of a given color is often referred to as a 'float'.


      So each little float is what makes up the stranding, when you talk about stranded knitting or fair isle. It's that stranding on the wrong side of your knitting that gives stranded items that particularly squooshy feeling and makes stranded knits thicker than normal knits.

      You want to make sure that your floats are not too tight. I can't emphasize that enough.

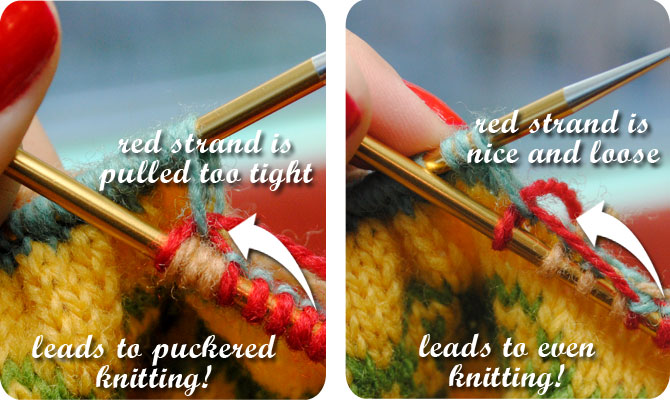
      How? When you stop using color A and start using color B, do not tug tightly on that strand of yarn or you'll pull your float too tight. If you do that, your work will end up puckered. You can block some of this out, but you simply can't beat your knitting into submission, much as you may try.

      When you go to knit with the next color in your pattern, knit that stitch but don't yank on the yarn to tighten it up, just keep it nice and loose. That will help keep the float loose at the back of the work, ultimately leading to nice and even colorwork. Because it's worth repeating: you want the yarn at the back of your work to be carried along loosely. You can always tighten up a stitch or two here and there but it's almost impossible to loosen up floats that are too tight. Really!

      I pulled out an old work-in-progress to show you a comparison. This isn't an extreme example, but you can kind of see the puckered part from the strands between the red and black colors being pulled too tightly as I knit. (This project was on double-pointed needles, not my favorite way to do stranded knitting. Hence this being a WIP a few years later.)


      Now, don't panic—your work may be a little puckery looking as you knit it. That's okay, and will block out. (Actually the above might even block out, but it's best to not chance it.)

      Take a look.


      But if your work is severely puckered, it's time to relax a bit and loosen things up.


      My secret to even stranded knitting

      I've been thinking for weeks about what I do to keep my stranding nice and even, and I've really only come up with one little trick, but it's the best tip I can give. It's so easy, too!

      I think some people have a tendency to scrunch up all the stitches close together on the needle when they do stranded knitting. Here's what that looks like, with the stitches on the needle in my right hand scrunched up together, i.e. the stitches that just got knit.


      Don't do this.

      Instead, when you're knitting, keep the stitches on your right-hand needle slightly spaced apart. Give them some breathing room.


      It's easy to do with a little motion of your right hand or fingers every so often to keep things spaced apart a bit. It helps give extra room for your floats and it helps keep you from pulling too tight. If you find you don't have enough space on your knitting needle to do this, switch to a slightly longer needle.

      When you get to the next color in your row, make sure those stitches on your right-hand needle are nice and spaced apart.


      You can see the difference in how the floats (strands at the back of the work) look when you do that, too.


      This also must be done when you go from one needle to the next when knitting with double-pointed needles (DPNs), or knitting with 2 circular needles. Your floats between the needles must be kept loose, otherwise you'll get a pucker between each needle.


      And that's my main advice for lovely and even stranded knitting. Don't knit it with a vice grip, and make sure your stitches are nice and spaced apart, especially between color changes. And remember, all the small puckers and wrinkles will smooth out once you block your knitting. Keep these tips in mind and you'll churn out beautiful stranded knitting projects.

      In my next post (which will be very soon!), I'll talk about dealing with vintage stranded patterns that do not have charts, how to chart them to save yourself oodles of time and frustration, and how to work with charts easily. Then we'll talk a little bit about colors and yarn, and swatching!


      Now do you have tips for what keeps your stranded knitting looking great? Please share in the comments!

      Friday, November 4, 2011

      VKC: Getting started with stranded (fair isle) knitting


      This post is the first official lesson in the Vintage Knitting College! I'm starting off with a series of posts for Colorwork: 101.

      Bestway #82 pattern
      As you know, you'll be following along with a pullover I'll be knitting from a 1940s pattern, Bestway #82. It's available as a .pdf from the Vintage Knitting Lady here, and available for your Ravelry queue here.

      But since my goal for the VKC is to cover beginning and advanced techniques, and since not everything I want to discuss will be covered in one single project, I'm going to intersperse other posts with tips and techniques along the way!

      Today, we'll discuss how you knit with multiples colors for stranded (sometimes called fair isle) knitting, including carrying your yarn without making a mess of it. In the next post I'll talk about keeping even tension and making the work look nice. Whether you knit vintage or not, the concept is still the same.


      The very basics of stranded knitting

      Stranded knitting refers to knitting with multiple colors in a single row, with the unused color carried or stranded along the back when it's not in use. Hence the name "stranding" or "stranded knitting". Usually, that's limited to two colors, but you may find 3 or more colors in some Icelandic and Scandinavian traditional patterns, for example, and occasionally in vintage patterns. Though it's most commonly done with two colors in a row, so that's what I'll focus on.

      Many people mistakenly refer to stranded knitting as fair isle knitting, when in actuality, fair isle is one type of stranding tradition, originating in the Shetland Islands of Scotland. Vintage stranded patterns from the 1930s through the 1950s almost always use the term fair isle to refer to stranded and intarsia patterns (I'll talk about intarsia, or "picture knitting", in the future). So I may include the term periodically, like I did in the title, as I'm not sure everyone knows the term stranded knitting. "Fair isle" is more familiar. (Kind of like referring to facial tissue as Kleenex, I guess?)

      Anyway, before you try it, it's easy to be a little intimidated by stranded knitting because you might think, "That looks complicated!"


      And at first glance, it might. Intricate shapes and patterns, and sometime lots of colors. But what you're looking at is just stockinette stitch. Knit on all rows if you are working in the round, or knit on the right-side rows, purl on the wrong-side rows if you're knitting flat. All you're doing is adding one more color per row! Sure, there is some technique to that, but when you boil it down, it's just stockinette stitch. And if you know how to knit, you know how to do it! So you're well on your way!


      Getting started with stranded knitting: how to carry your yarn

      The first thing you need to think about when starting a stranded knitting project is the fact that you're dealing with two balls of yarn at a time. The basic idea is simple: knit a certain number of stitches in the first color, knit a certain number of stitches in the second color, knit a certain number of stitches in the first color again, etc. Your pattern or chart will tell you how many stitches of each color. (More on that as we get further into our lessons.) But forget the pattern for a moment.

      For beginners, it can be difficult to figure out what to actually do with the yarn.

      Where does the second strand go when you're not using it? Where do you put the balls of yarn when you're knitting? How do you keep two strands of yarn from turning into a big, annoying tangled mess that you want to hurl through the window?

      There are different ways to knit with two colors of yarn in the same row. What you choose to do is entirely up to you and what feels best in your hands!

      I'm going to go through three main methods for working stranded knitting. The first two are common (and you can find any number of tutorials online for each), the third is not even considered a "real" method by some, but I stubbornly maintain it is. They key is to play around with different methods until you hit on something that works for you! Don't let anyone tell you there is a right way and a wrong way to do it. There are lots of ways.


      Method 1. Carry both strands of yarn in your left hand or your right hand (depending on which hand you normally use to carry your yarn). You can do this with both strands over your pointer finger, or one on your pointer finger and one on your middle finger, or whatever works best for you.


      You alternate knitting with the background color and the main color. When I knit normally, I kind of hook the working yarn with my finger when I throw it over the needle, so two strands on the same hand is hard for me. I can do it, but it's awkward and difficult for me to keep the strands from twisting around each other.


      Method 2. Carry one strand of yarn in your left hand, and one strand of yarn in your right hand. This means getting comfortable doing a knit stitchand purl if you're going to knit flatin both styles of knitting. In the U.S., it would mean knitting both Continental style ("picking" with your left hand) and English style ("throwing" with your right hand).


      Here's a tip: you might find that you don't tension the yarn or carry it across your hand the same way with both hands. That's totally fine! There's no rule that you have to do it the same in each hand.

      In my right hand, as I mentioned, I kind of hook the yarn with my finger as I make a stitch, and keep the working yarn a few inches away from my knitting. In my left hand, I keep the working yarn much closer to my knitting. It's just what works for me and when I'm knitting, it probably looks totally strange. (Who cares.)


      Method 3. Carry one strand of yarn at a time, dropping it and picking up the next color when you get to that stitch. This means knitting with color A, dropping it, knitting with color B, dropping it, knitting with color A, etc.


          Method 3 is the one method you'll rarely see cited as a way to knit stranded in any knitting reference. People almost never tell you to do this. They say it's way slower and you're more apt to make tangles with your two colors compared to Methods 1 and 2. One of my fair isle books goes so far as to say it's the one way to carry your yarn that you should never use. What do I say to that? Malarkey! I taught myself stranded knitting using this method, simply picking up the strand I needed to use next when I got to that stitch. Why? Because it was the first thing that make sense to me. Yes, it's a little more slow than the other methods, and a pain if you're changing colors frequently (like every other stitch). But did it get the job done, and produce even, beautiful colorwork? Yes. In the end, that's all that matters. If it produces knitting and makes you happy then I don't think it's fair to call it a "wrong" technique. Do what works for you and gets the job done.

          What do I do now? I use Method 2. I normally knit English style, carrying my working yarn in my right hand (a "thrower" versus a "picker"). It took me a long time to learn to successfully do a knit stitch in Continental style, carrying the yarn in my left hand. I can do it now, but I reserve it only for when I'm doing stranded knitting. I still prefer English style. It just feels better to me.


          Be consistent with how you carry your yarn

          This is really important in stranded knitting and goes hand-in-hand with carrying your yarn. If your yarn is a tangled mess all the time, you're going to get frustrated quickly.

          The easiest way to keep things tangle-free is by being consistent. When you knit (no matter what method you select for knitting with two colors) you always want one color to go over, the other color to go under. And you want the same color doing it every time. When you're knitting, you'll see how this works out, with one color over and one under.

          In a row where you're knitting with red and tan, if red goes over and tan goes under, do the same consistently across the entire row. If you mix that up, your strands of yarn will start to twist around each other and you'll find yourself untangling yarn a lot. And that's just a pain.

          If you still can't visualize why it mattes, consider how you braid/plait hair. You always have to keep the location of each strand the same, or you won't end up with a proper braid. If the right strand goes over the middle strand once, but then goes under the next time, and over after that a couple of times... well, the strands will get messy. Same thing with yarn.


          Be consistent! It may look confusing now, but when you start knitting, you'll understand how the yarn can get twisted and tangled if you're not consistent.


          (In full disclosure, the example above wouldn't happen if you were actually knitting with two hands, as like I said, the yarn naturally stays over or under in each hand. That's my mistake in staging this picture. Whoops!)

          Not only will being consistent mean you won't be spending half your time untangling two balls of yarn, in the long run your knitting will look better if you're consistent. Why? Because, one of the colors will dominate just slightly over the other color. Most people feel it's the yarn that is carried under that ends up more dominant (as a sliiightly bigger stitch is made that way), and thus make sure that's the pattern color, not the background color. Either way, that consistency leads to a more visually balanced piece of knitting.

          Now I haven't seen much of a difference in my work one way or the other, so I wouldn't worry too much about which one is more noticeable, the background color or the pattern color. Just worry about consistency. Across an entire row and for your whole project, always carry the background color in one hand. No matter which hand you select, do it the same way every time. (Here's an interesting post on the topic of yarn dominance if you'd like to read more.)


          How to keep your balls of yarn tidy when working with two colors

          Consistency is a big step. But the second is ball juggling. Almost literally. Where do they both go? To your left, to your right, one on each side? Do you move them around?

          If you knit with Method 1 (carrying two strands in one hand), you will have to be diligent about keeping track of your yarn. You can try placing one ball on either side of you, but you might find it feels awkward with the second color pulling across your lap. If so, keep them both on the same side you carry your yarn.

          If you're carrying both strands in your right hand, it's easiest to have the color that goes under in front. Why? It just works out to be less tangle-y. (How's that for a technical answer?)


          If you're carrying both strands in your left hand, it's easiest to have the color that goes under in back.


            If you knit with Method 2 (carrying a strand in each hand), it's very easy. Put the yarn you're carrying in your left hand on your left side, and the yarn you're carrying in your right hand on your right side. The balls will stay tangle free because you are consistently knitting the same color in the same hand. I find this method the easiest to stay neat and tidy, but if you're knitting on the go, it can be more difficult. (In cases like that, I put my project bag in front of me, not to my side.)


                If you knit with Method 3 (picking up and dropping each strand), your best bet is like Method 1, to place both balls of yarn next to you on the same side you carry your yarn. Just like in Method 1, If you carry yarn in your left hand, it's easiest to have the color that goes under in back, and if you carry yarn in your left hand, it's easiest to have the color that goes under in front.


                What's next?

                I think that's enough for one post! In the next post in Colorwork: 101, I'll talk all about tips for actually knitting with two colors of yarn, now that you get the general idea for how to manage your yarn. I'll focus on how you master tension so your colorwork looks good. That's one of the trickiest parts about stranded colorwork. Topics coming up soon after that will be color theory with a vintage perspective in mind, and how to deal with color charts, vintage stranded patterns, and vintage patterns that are uncharted!

                Okay so far? I expect some bumps in the road as we go along, so please let me know if you have any questions or concerns. I'll try to address them in the comments or dedicate separate posts to them when that makes sense. I'm sorry I don't currently have a way to show you these methods in video after my fiasco with the video camera not working out. But if you've followed my blog for awhile you know my penchant for detailed photos, so hopefully we'll be okay. ;) And of course, at the end of each lesson I'll point you to other resources that I find helpful.

                Side note #1: Now that I'm starting in on the actual lessons, I'll be updating the Vintage Knitting College page with links to each post. I'm still figuring out how exactly I'll organize it all, which will probably change over time as the VKC grows.

                Side note #2: Check out my guest post today on Kestrel Finds and Makes, she did a little interview with me for her Knit Week! :)


                Resources for this post:

                Thursday, November 3, 2011

                Kickoff tomorrow! Vintage Knitting College Colorwork: 101


                I'm pleased to finally announce that tomorrow will kickoff my Vintage Knitting College series, with the first post in Colorwork: 101! I'll be talking about the very basics of stranded knitting over a few posts. Tomorrow we'll start off with how to carry your yarn and how to keep your balls of yarn tidy and your yarn tangle-free. Then in the next few posts after that I'll talk about keeping even tension while stranding and how it plays into beautiful colorwork, color theory with a vintage eye in mind, and tips to make the entire stranded knitting process go nice and smoothly. I'm pretty excited, I have to say!

                See you tomorrow!

                Thursday, October 6, 2011

                Sneak peek: Colorwork: 101 with the Vintage Knitting College


                We're off tomorrow on a weekend trip to visit my brother- and sister-in-law, niece and nephew in St. Louis. I've been so busy this week and haven't even thought about packing yet. Eek!

                Before that, though, I wanted to share my official sneak peek of the first project for the Colorwork: 101 series for my new Vintage Knitting College! I promised to let you know ahead of time, in case anyone wanted to follow along with the pattern. It's perfectly okay if you don't; in fact that's why I'm setting up the Vintage Knitting College in the first place, to serve as a continuing resource! :)


                There's a little taste for you. The pattern is from Bestway #82, a 1940s stranded pullover inspired by traditional fair isle designs. You can see a bit of my first swatch, the chart I colored in from the pattern, and some of the colors I'm toying with (trying to stay close to the original colors the pattern calls for). If you're interested in the pattern, you can purchase a digital copy of the pattern booklet (which includes three other stranded sweaters) from the Vintage Knitting Lady here. Of course, the principals I'll cover in my tutorials will apply to any pattern! I expect to start posts for Colorwork: 101 in the next couple of weeks after I get some other knitting and sewing projects off my plate. I'm really excited to get started!

                Now, in the meantime, if you're interested in a button for your blog to help promote the Vintage Knitting College, here's several to select from! Please link it to the below page:

                Link to the Vintage Knitting College home:
                http://blog.bygumbygolly.com/p/vintage-knitting-college.html


                I setup that page to organize all things related to the VKC in one handy dandy location, so as I dive into Colorwork: 101 I'll be linking to posts there and keeping everything organized by subject matter. So while there's nothing much there yet except these buttons, it will grow over time!


                And a few for those of you with non-white backgrounds on your blog:


                Anyway, I'm super excited to kickoff this project soon. Hope you enjoyed the little sneak peek!
                Related Posts Plugin for WordPress, Blogger...