Wednesday, November 30, 2011

VKC: Tension, puckers & even stranded knitting


Today, let's talk about how to keep your stranded knitting nice and even looking! I'll cover a few things that tie together to make that happen, and give you my best advice for lovely looking stranded knitting.


Tension

You may or may not find that your tension changes from knitting with one color to knitting with two colors. Many people say your tension tightens up when you knit stranded (producing more stitches per inch than when you knit with one color), or that you get more relaxed as you go. You won't really know until you try it out for yourself.

Using the same yarn, my gauge is pretty much consistent whether I'm knitting with one color or two. What's this all mean? That you will need to do a gauge swatch for a stranded knitting project. Period, end of story. It's okay though, because you'll want to do one anyway to make sure you like how your colors play together. (We'll cover that in another post soon!)


Floats and puckers

When you work in stranded knitting, only one color is being used in a stitch at a time, obviously. So the other color waits for you at the back of the work, to get knit with the next time it's needed. That strand of yarn between the stitches of a given color is often referred to as a 'float'.


So each little float is what makes up the stranding, when you talk about stranded knitting or fair isle. It's that stranding on the wrong side of your knitting that gives stranded items that particularly squooshy feeling and makes stranded knits thicker than normal knits.

You want to make sure that your floats are not too tight. I can't emphasize that enough.

How? When you stop using color A and start using color B, do not tug tightly on that strand of yarn or you'll pull your float too tight. If you do that, your work will end up puckered. You can block some of this out, but you simply can't beat your knitting into submission, much as you may try.

When you go to knit with the next color in your pattern, knit that stitch but don't yank on the yarn to tighten it up, just keep it nice and loose. That will help keep the float loose at the back of the work, ultimately leading to nice and even colorwork. Because it's worth repeating: you want the yarn at the back of your work to be carried along loosely. You can always tighten up a stitch or two here and there but it's almost impossible to loosen up floats that are too tight. Really!

I pulled out an old work-in-progress to show you a comparison. This isn't an extreme example, but you can kind of see the puckered part from the strands between the red and black colors being pulled too tightly as I knit. (This project was on double-pointed needles, not my favorite way to do stranded knitting. Hence this being a WIP a few years later.)


Now, don't panic—your work may be a little puckery looking as you knit it. That's okay, and will block out. (Actually the above might even block out, but it's best to not chance it.)

Take a look.


But if your work is severely puckered, it's time to relax a bit and loosen things up.


My secret to even stranded knitting

I've been thinking for weeks about what I do to keep my stranding nice and even, and I've really only come up with one little trick, but it's the best tip I can give. It's so easy, too!

I think some people have a tendency to scrunch up all the stitches close together on the needle when they do stranded knitting. Here's what that looks like, with the stitches on the needle in my right hand scrunched up together, i.e. the stitches that just got knit.


Don't do this.

Instead, when you're knitting, keep the stitches on your right-hand needle slightly spaced apart. Give them some breathing room.


It's easy to do with a little motion of your right hand or fingers every so often to keep things spaced apart a bit. It helps give extra room for your floats and it helps keep you from pulling too tight. If you find you don't have enough space on your knitting needle to do this, switch to a slightly longer needle.

When you get to the next color in your row, make sure those stitches on your right-hand needle are nice and spaced apart.


You can see the difference in how the floats (strands at the back of the work) look when you do that, too.


This also must be done when you go from one needle to the next when knitting with double-pointed needles (DPNs), or knitting with 2 circular needles. Your floats between the needles must be kept loose, otherwise you'll get a pucker between each needle.


And that's my main advice for lovely and even stranded knitting. Don't knit it with a vice grip, and make sure your stitches are nice and spaced apart, especially between color changes. And remember, all the small puckers and wrinkles will smooth out once you block your knitting. Keep these tips in mind and you'll churn out beautiful stranded knitting projects.

In my next post (which will be very soon!), I'll talk about dealing with vintage stranded patterns that do not have charts, how to chart them to save yourself oodles of time and frustration, and how to work with charts easily. Then we'll talk a little bit about colors and yarn, and swatching!


Now do you have tips for what keeps your stranded knitting looking great? Please share in the comments!

Monday, November 28, 2011

My lovely stranded cardigan!

Hi everyone, I'm back home! I have massive catching up to do on my feed reader. My, how everyone's been posting like a maniac!

We had a lovely, albeit somewhat brief, trip to my mom's outside of Washington, D.C. I'm sorry I didn't get to meet up with any D.C. bloggers, however with Thanksgiving and a family party, and my best friend from college visiting too for part of the trip, time was very limited.

Just before we left for our trip, I finished up my latest sweater! I'm over the moon about it. The pattern is Bestway B2637, called Fair Isle Cardigan. You can purchase the .pdf here, and find it on Ravelry here. I don't have an exact date, but the pattern is from the 1940s.


You can see I didn't stray very far from the original pattern colors. I liked the color scheme so well I didn't see a need to go in a different direction. Lately I've been more inclined to do that with vintage colorwork patterns, because I like the original so much.


While I kept the color scheme about the same, I made a few other changes. The first change was gauge. The pattern was knit at 9 stitches per inch in fingering weight yarn. As someone who loves vintage styles, I knit a lot with fingering weight. However 9 stitches an inch is generally a bit more dense than I like to knit sweaters. I prefer to knit fingering weight on somewhere between 7 to 8 stitches per inch for a sweater, obviously depending upon the yarn and pattern. So this pattern I knit at 7.5 spi, though in the end I blocked it closer to 7 spi.


Changing the gauge as I did, I also had to tweak the sizing a bit. The final width around the bust is 1" larger than my full bust. While it looks like there is shaping to the body, there isn't. The ribbing is knit on about 10% fewer stitches than the body, then in the first body row I increased to the full number of stitches that was knit with all the way up to the bust.

(Oh yes, here's the new haircut too! Only this isn't representative of how it looks after a fresh set, but is how it looks the day after if I don't put rollers back in at night, except for my bangs. So they are much softer curls.)


The complicating factor about changing the sizing of an allover colorwork pattern is making sure the colorwork lines up the way you'd like it to. That took a little bit of doing. I started by charting out the pattern, so I knew it was 16 stitches across for one pattern repeat. I decided where I wanted the center stitch across the back to be, and worked around to the front from there.


I knit this with a combination of yarns. Mostly St-Denis Boreale, with a bit of Jamieson's Shetland Spindrift and KnitPicks Palette. I knew the Shetland yarn was stickier than the other two, but it was just the right gold I was looking for and all the yarns played well together.

Because I changed the sizing in the pattern, I had to change the sleeve cap. I wanted the rows of the pattern to match up from the sleeve to the shoulder, so I had to make sure the sleeve cap was two things: 1) exactly the same number of rows as the upper body of the sweater (from armhole to shoulder shaping), and 2) started at exactly the same row on the chart as on the body after the armholes. The excess ease could not be worked in along the pattern, otherwise it would throw off the row-to-row seaming. So I gathered the sleeve caps at the top when setting in the sleeves, which I did with mattress stitch.


The chart doesn't flow from the sleeve to the body (even I'm not that anal!), but the rows line up quite nicely. The gathered cap works great with this style, too.


This project was steeked. A steek is a bridge of extra stitches knit where you would like an opening to be. You later cut through the steek, leaving the opening. One major benefit of steeks when used in stranded knitting is not having to slow down to purl in a stranded pattern, as well as being able to cut away all loose ends so you don't have to weave them in.

In the body of this sweater, the front of the cardigan and the armholes were steeked. I also knit the two sleeves together separated by steeks for the length of the sleeves, then for the sleeve caps. Once they were cut, I seamed up the sleeve seams. I could have knit them separately, but it ensured they were perfectly matched and I didn't have to weave in any ends.


I reinforced the steeks with sturdy hand stitches prior to cutting. This wasn't really necessary with the wool I was using, as it's grabby enough not to ravel, however it leaves a very neat and tidy edge inside. I didn't even bother to tack down my steeks. (Incidentally, these are all topics I'll cover in the long term in Colorwork: 101! But I'll be writing up more posts about basics, first. I did post a number of photos with explanations on my Ravelry project page, if you'd like to see more.)

The lumpy bits you see at the top of the shoulder in the below photo is from the end of the sleeve cap steek and the gathering of the top of the cap. This actually worked a little bit like sewing in a shoulder pad, so I didn't need to make any!


I'm just in love with this cardigan. The fit is perfect and I love the design and colors. I've worn it several times since I finished it, and I only finished it last Monday. Even though I have a million other projects planned, it makes me want to run right out and knit one just like it, but with another colorwork chart. I had a couple of people yesterday on Ravelry say it reminded them of the 1940s Shetland fair isle cardigan that knitwear designer Kate Davies posted about on her blog, which is a huge compliment to me.


I hope my sweater looks as good in 70 years as a real hand-knit one from the 1940s does now!

Monday, November 21, 2011

Saturday evening outfit & haircut

We're off to my mom's tomorrow. So before we jet, I thought I'd post a quick outfit, mostly to show you all that I got a haircut last weekend! I'd been debating about chopping another few inches off for awhile, and went for it.

Now you'll never see me wearing my hair down like this, but you can see the length. We went out with friends Saturday night and I didn't feel like doing anything to my hair after the cut that afternoon, so I just did a little front roll and plopped on a trusty beret. So easy in autumn.


I'm really pleased with how the cut worked out. I set it last night for the first time since the haircut using my trusty setting pattern. And the style is just what I was looking for! Very late 30s. So you'll have to wait to see how it looks set until I have photos. :)


Outfit details: variety of yellow Bakelite bangles, wool gabardine trousers from Allure Originals,  mustard blouse with pintucks from Small Earth Vintage, vintage shrug from forever ago (probably one of my most frequently worn staples), fair isle beret hand knit by me. Can you tell I've been on a yellow kick? I just can't seem to get enough of it this autumn!

Have a wonderful week, and a very Happy Thanksgiving to my fellow American readers! I'll have lots to share when I'm back!

Friday, November 18, 2011

Jitterbuggin 30% off sale through Sunday

Hi everyone! I have continued the trend of being head-spinningly busy lately! I was hoping to get not one but two Vintage Knitting College posts written up this week, and have come up with a big, fat zero! We're off to visit my mom and step-dad outside Washington, D.C. next week for Thanksgiving, so I'm hoping to have a bit of free time to work on at least one then.

In the meantime, I thought I'd alert you to a sale I found out about. Jitterbuggin is having a 30% off sale through Sunday!

When people talk about vintage vs. me-made vs. repro, such as Stephanie of The Girl With the Star-Spangled Heart did last week in this thoughtful post, my first thought in the repro category, with a few exceptions, isn't the bigger companies that focus on repro or more frequently retro/pin-up-inspired (i.e. not actually trying to recreate a vintage style, but running with the feeling).

Instead, I first think of the seamstresses who sell in small online shops or Etsy, like Nudeedudee, Jitterbuggin and Allure Originals. Yes, you'll likely pay more money for a custom or small run piece than you would with a large retro brand, but let's face it—even some of those bigger brands are very pricey, and not even necessarily using quality materials or craftsmanship. (Stretch bengaline comes to mind... I'm not a fabric snob but good gracious, I hope I never wear that fabric again, I've done my time with it. lol)

When I'm able to, I like to support the smaller repro companies, who are sometimes a company of one! I just don't sew enough to be able to bring to life everything I want to wear, and when I can't find it vintage or would prefer a more longer-lasting alternative (for, say, a particular work piece that gets a ton of use and needs to be hard-wearing), I turn to gals like these. Instead of "me-made" I think of it as "she-made". ;) Plus it gives me such a warm and fuzzy feeling to support an indie business, when I can put names to faces and have an ongoing relationship. It's just something I've always liked to do when I can.

So when I saw Jitterbuggin was having a sale, I wanted to pass on the love. I have a few pieces from Kim, and I love them all. In fact now that I think about it, the red checked bow blouse in my blog header is from Jitterbuggin and damn if it's not one of my favorite summer tops.

Pop on over to Jitterbuggin and take a peek around. Use the coupon code "Autumn Leaves" for 30% off through Sunday. I'll leave you with a snap of my new favorite piece of hers, my green pinafore dress!

Friday, November 11, 2011

Autumn day outfit #2

Goodness, where has this week gone? That's what happens when you have a cold. Suddenly it's Friday and you feel like you haven't accomplished anything.

Since I haven't had the time to write up a blog post, you'll have to make do with another outfit post. Last weekend we went to the International Expo of Sculptural and Functional Art and Intuit Show of Folk and Outsider Art. My tastes definitely lean to the latter.

This was my first time wearing this dress, a handmade vintage wool dress with (what I think are) dolman sleeves. I absolutely love it. The woman who made it took such care, too. It's meticulous on the inside, including Hong Kong seams. What era do you think it's from? I'm frankly not sure.


This brooch is one of my favorites, thrifted at some point in time. It was a really windy day, but warm enough that the dress was enough, so I pinned the shawl on and through the dress so it wouldn't keep blowing away.


I love these gloves with this purse. When I knit them, I had forgotten I had a perfectly matching wicker purse. Kismet! It makes me think I may actually knit more gloves, after all, even though the fingers are such a chore. Or perhaps I shall be on the hunt for some fantastic vintage ones, like Charlotte of Tuppence Ha'Penny detailed in her recent post. I always long to have more matching accessories, but never seem to do anything about it.


Outfit details: vintage dress from La Poubelle Vintage; 30s/40s shoes from a vendor at Randolph Street Market; thrifted vintage brooch; Bakelite earrings from Etsy; gloves, beret, shawl all hand-knit by me.


Have a great weekend, everyone!

Monday, November 7, 2011

My guest post at Elegant Musings

Hi everyone! Ever wanted to sew a ribbon button band onto a cardigan? I'm excited to point you to my guest post today over at Casey's Elegant Musings, where you can read my tutorial!

See, I told you that you'd hear more about the Campus Compliments cardigan pattern I posted. ;)

Sunday, November 6, 2011

An autumn day outfit

I haven't done a real outfit post in awhile!


Yes, that's my Halloween beret. While I had my jacket on for most of the pictures in that post, these photos were taken the same day, just sans jacket and scarf. Cheeky, no?


This is what I was wearing for the outer portion of the outfit. I'm mainly showing you because I love this doorway. Isn't it amazing? I feel it looks like it's out Europe! It's down the block from our friend's apartment building.


It may be one of the last outfit photos I'll get to do without gobs of outwear on for the next several months, so I figured I'd take the opportunity while I have it.


This was a Saturday afternoon errands outfit last weekend. I wore this to watch our friend's cats while she was out of town, and to ask 20 minutes worth of questions to the nice folks who work at the Apple store downtown.


The only thing actually vintage in this outfit is my shoes and jewelry. I haven't the foggiest what I was doing in the photo below, but at least you can see my brooch and bracelets. It's further proof that I make the most ridiculous faces when I'm not paying attention. (Seriously, I recently showed someone our wedding photos and he even told me "you make weird faces".)


The pinafore is from The Black Pinafore, the hat I knit, and the pullover I knit. And yes, it's just exactly as chartreuse in person as the photos make it out to be. It's not a new project of mine, I knit it over a year ago (Michelene, on Ravelry here).


There's nothing really vintage about the pullover, but I think it pairs nicely with the late 30s styling of the pinafore and shoes. I wear both the pullover and pinafore separately quite a bit, and now I love how they pair together, too.


Outfit details: pinafore skirt from The Black Pinafore, 30s wedges from Beth at V is for Vintage, jewelry and brooch are vintage, beret and pullover handknit by me.

And one last photo, as I haven't shared a "smooshy" lately. (You know, those photos where you smoosh together and take a photo and hope you're centered and your arm doesn't take up half the picture.)


Hope you've had a lovely weekend!

Friday, November 4, 2011

VKC: Getting started with stranded (fair isle) knitting


This post is the first official lesson in the Vintage Knitting College! I'm starting off with a series of posts for Colorwork: 101.

Bestway #82 pattern
As you know, you'll be following along with a pullover I'll be knitting from a 1940s pattern, Bestway #82. It's available as a .pdf from the Vintage Knitting Lady here, and available for your Ravelry queue here.

But since my goal for the VKC is to cover beginning and advanced techniques, and since not everything I want to discuss will be covered in one single project, I'm going to intersperse other posts with tips and techniques along the way!

Today, we'll discuss how you knit with multiples colors for stranded (sometimes called fair isle) knitting, including carrying your yarn without making a mess of it. In the next post I'll talk about keeping even tension and making the work look nice. Whether you knit vintage or not, the concept is still the same.


The very basics of stranded knitting

Stranded knitting refers to knitting with multiple colors in a single row, with the unused color carried or stranded along the back when it's not in use. Hence the name "stranding" or "stranded knitting". Usually, that's limited to two colors, but you may find 3 or more colors in some Icelandic and Scandinavian traditional patterns, for example, and occasionally in vintage patterns. Though it's most commonly done with two colors in a row, so that's what I'll focus on.

Many people mistakenly refer to stranded knitting as fair isle knitting, when in actuality, fair isle is one type of stranding tradition, originating in the Shetland Islands of Scotland. Vintage stranded patterns from the 1930s through the 1950s almost always use the term fair isle to refer to stranded and intarsia patterns (I'll talk about intarsia, or "picture knitting", in the future). So I may include the term periodically, like I did in the title, as I'm not sure everyone knows the term stranded knitting. "Fair isle" is more familiar. (Kind of like referring to facial tissue as Kleenex, I guess?)

Anyway, before you try it, it's easy to be a little intimidated by stranded knitting because you might think, "That looks complicated!"


And at first glance, it might. Intricate shapes and patterns, and sometime lots of colors. But what you're looking at is just stockinette stitch. Knit on all rows if you are working in the round, or knit on the right-side rows, purl on the wrong-side rows if you're knitting flat. All you're doing is adding one more color per row! Sure, there is some technique to that, but when you boil it down, it's just stockinette stitch. And if you know how to knit, you know how to do it! So you're well on your way!


Getting started with stranded knitting: how to carry your yarn

The first thing you need to think about when starting a stranded knitting project is the fact that you're dealing with two balls of yarn at a time. The basic idea is simple: knit a certain number of stitches in the first color, knit a certain number of stitches in the second color, knit a certain number of stitches in the first color again, etc. Your pattern or chart will tell you how many stitches of each color. (More on that as we get further into our lessons.) But forget the pattern for a moment.

For beginners, it can be difficult to figure out what to actually do with the yarn.

Where does the second strand go when you're not using it? Where do you put the balls of yarn when you're knitting? How do you keep two strands of yarn from turning into a big, annoying tangled mess that you want to hurl through the window?

There are different ways to knit with two colors of yarn in the same row. What you choose to do is entirely up to you and what feels best in your hands!

I'm going to go through three main methods for working stranded knitting. The first two are common (and you can find any number of tutorials online for each), the third is not even considered a "real" method by some, but I stubbornly maintain it is. They key is to play around with different methods until you hit on something that works for you! Don't let anyone tell you there is a right way and a wrong way to do it. There are lots of ways.


Method 1. Carry both strands of yarn in your left hand or your right hand (depending on which hand you normally use to carry your yarn). You can do this with both strands over your pointer finger, or one on your pointer finger and one on your middle finger, or whatever works best for you.


You alternate knitting with the background color and the main color. When I knit normally, I kind of hook the working yarn with my finger when I throw it over the needle, so two strands on the same hand is hard for me. I can do it, but it's awkward and difficult for me to keep the strands from twisting around each other.


Method 2. Carry one strand of yarn in your left hand, and one strand of yarn in your right hand. This means getting comfortable doing a knit stitchand purl if you're going to knit flatin both styles of knitting. In the U.S., it would mean knitting both Continental style ("picking" with your left hand) and English style ("throwing" with your right hand).


Here's a tip: you might find that you don't tension the yarn or carry it across your hand the same way with both hands. That's totally fine! There's no rule that you have to do it the same in each hand.

In my right hand, as I mentioned, I kind of hook the yarn with my finger as I make a stitch, and keep the working yarn a few inches away from my knitting. In my left hand, I keep the working yarn much closer to my knitting. It's just what works for me and when I'm knitting, it probably looks totally strange. (Who cares.)


Method 3. Carry one strand of yarn at a time, dropping it and picking up the next color when you get to that stitch. This means knitting with color A, dropping it, knitting with color B, dropping it, knitting with color A, etc.


      Method 3 is the one method you'll rarely see cited as a way to knit stranded in any knitting reference. People almost never tell you to do this. They say it's way slower and you're more apt to make tangles with your two colors compared to Methods 1 and 2. One of my fair isle books goes so far as to say it's the one way to carry your yarn that you should never use. What do I say to that? Malarkey! I taught myself stranded knitting using this method, simply picking up the strand I needed to use next when I got to that stitch. Why? Because it was the first thing that make sense to me. Yes, it's a little more slow than the other methods, and a pain if you're changing colors frequently (like every other stitch). But did it get the job done, and produce even, beautiful colorwork? Yes. In the end, that's all that matters. If it produces knitting and makes you happy then I don't think it's fair to call it a "wrong" technique. Do what works for you and gets the job done.

      What do I do now? I use Method 2. I normally knit English style, carrying my working yarn in my right hand (a "thrower" versus a "picker"). It took me a long time to learn to successfully do a knit stitch in Continental style, carrying the yarn in my left hand. I can do it now, but I reserve it only for when I'm doing stranded knitting. I still prefer English style. It just feels better to me.


      Be consistent with how you carry your yarn

      This is really important in stranded knitting and goes hand-in-hand with carrying your yarn. If your yarn is a tangled mess all the time, you're going to get frustrated quickly.

      The easiest way to keep things tangle-free is by being consistent. When you knit (no matter what method you select for knitting with two colors) you always want one color to go over, the other color to go under. And you want the same color doing it every time. When you're knitting, you'll see how this works out, with one color over and one under.

      In a row where you're knitting with red and tan, if red goes over and tan goes under, do the same consistently across the entire row. If you mix that up, your strands of yarn will start to twist around each other and you'll find yourself untangling yarn a lot. And that's just a pain.

      If you still can't visualize why it mattes, consider how you braid/plait hair. You always have to keep the location of each strand the same, or you won't end up with a proper braid. If the right strand goes over the middle strand once, but then goes under the next time, and over after that a couple of times... well, the strands will get messy. Same thing with yarn.


      Be consistent! It may look confusing now, but when you start knitting, you'll understand how the yarn can get twisted and tangled if you're not consistent.


      (In full disclosure, the example above wouldn't happen if you were actually knitting with two hands, as like I said, the yarn naturally stays over or under in each hand. That's my mistake in staging this picture. Whoops!)

      Not only will being consistent mean you won't be spending half your time untangling two balls of yarn, in the long run your knitting will look better if you're consistent. Why? Because, one of the colors will dominate just slightly over the other color. Most people feel it's the yarn that is carried under that ends up more dominant (as a sliiightly bigger stitch is made that way), and thus make sure that's the pattern color, not the background color. Either way, that consistency leads to a more visually balanced piece of knitting.

      Now I haven't seen much of a difference in my work one way or the other, so I wouldn't worry too much about which one is more noticeable, the background color or the pattern color. Just worry about consistency. Across an entire row and for your whole project, always carry the background color in one hand. No matter which hand you select, do it the same way every time. (Here's an interesting post on the topic of yarn dominance if you'd like to read more.)


      How to keep your balls of yarn tidy when working with two colors

      Consistency is a big step. But the second is ball juggling. Almost literally. Where do they both go? To your left, to your right, one on each side? Do you move them around?

      If you knit with Method 1 (carrying two strands in one hand), you will have to be diligent about keeping track of your yarn. You can try placing one ball on either side of you, but you might find it feels awkward with the second color pulling across your lap. If so, keep them both on the same side you carry your yarn.

      If you're carrying both strands in your right hand, it's easiest to have the color that goes under in front. Why? It just works out to be less tangle-y. (How's that for a technical answer?)


      If you're carrying both strands in your left hand, it's easiest to have the color that goes under in back.


        If you knit with Method 2 (carrying a strand in each hand), it's very easy. Put the yarn you're carrying in your left hand on your left side, and the yarn you're carrying in your right hand on your right side. The balls will stay tangle free because you are consistently knitting the same color in the same hand. I find this method the easiest to stay neat and tidy, but if you're knitting on the go, it can be more difficult. (In cases like that, I put my project bag in front of me, not to my side.)


            If you knit with Method 3 (picking up and dropping each strand), your best bet is like Method 1, to place both balls of yarn next to you on the same side you carry your yarn. Just like in Method 1, If you carry yarn in your left hand, it's easiest to have the color that goes under in back, and if you carry yarn in your left hand, it's easiest to have the color that goes under in front.


            What's next?

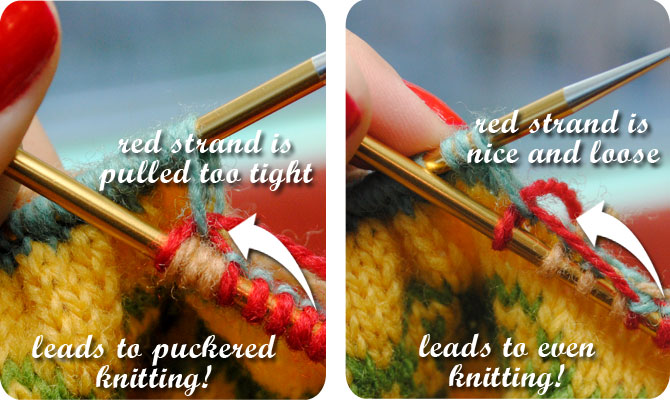
            I think that's enough for one post! In the next post in Colorwork: 101, I'll talk all about tips for actually knitting with two colors of yarn, now that you get the general idea for how to manage your yarn. I'll focus on how you master tension so your colorwork looks good. That's one of the trickiest parts about stranded colorwork. Topics coming up soon after that will be color theory with a vintage perspective in mind, and how to deal with color charts, vintage stranded patterns, and vintage patterns that are uncharted!

            Okay so far? I expect some bumps in the road as we go along, so please let me know if you have any questions or concerns. I'll try to address them in the comments or dedicate separate posts to them when that makes sense. I'm sorry I don't currently have a way to show you these methods in video after my fiasco with the video camera not working out. But if you've followed my blog for awhile you know my penchant for detailed photos, so hopefully we'll be okay. ;) And of course, at the end of each lesson I'll point you to other resources that I find helpful.

            Side note #1: Now that I'm starting in on the actual lessons, I'll be updating the Vintage Knitting College page with links to each post. I'm still figuring out how exactly I'll organize it all, which will probably change over time as the VKC grows.

            Side note #2: Check out my guest post today on Kestrel Finds and Makes, she did a little interview with me for her Knit Week! :)


            Resources for this post:
            Related Posts Plugin for WordPress, Blogger...